Table of contents
Open Table of contents
Vue 的组件化
由于组件化特殊,需采用
vue cli创建项目。如何安装 Vue cli 请见初识 Vue3
注册组件
注册组件分成两种:
- 全局组件:在任何其他的组件中都可以使用的组件
- 局部组件:只有在注册的组件中才能使用的组件
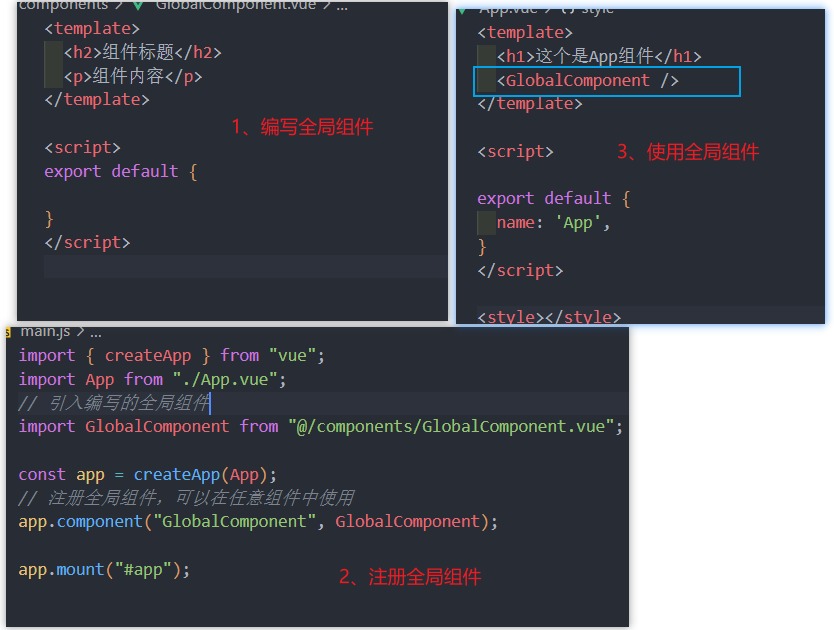
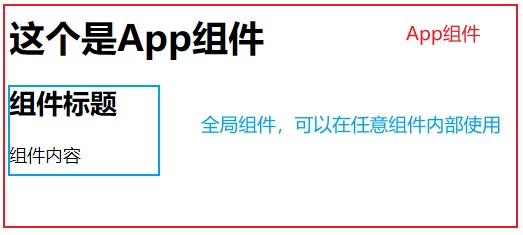
全局组件
注册全局组件的流程:
- 创建全局组件进行编写
- 在
main.js中引入并注册该组件 - 在其它组件中使用
局部组件
通常使用组件的时候采用的都是局部注册,因为全局组件就算有些没有被使用,在打包时也会被一起打包,增加包的大小。
<!-- ComponentA 组件 -->
<template>
  <h2>这是局部组件 A</h2>
</template>

<!-- ComponentB 组件 -->
<template>
  <h2>这是局部组件 B</h2>
</template>

<!-- 组件 C 使用 A 和 B 两个组件 -->
<template>
  <h1>这个是App组件</h1>
  <ComponentA />
  <ComponentB />
</template>

<script>
  // 引入组件
  import ComponentA from "@/components/ComponentA.vue";
  import ComponentB from "@/components/ComponentB.vue";
  export default {
    name: "App",
    // 注册局部组件
    components: {
      // 这里是 ComponentA:ComponentA 的简写
      ComponentA,
      ComponentB,
    },
  };
</script>
MyComponent 注册后,在 template 中使用时可以写作<my-component />或<MyComponent />
[!WARNING] 局部引入的组件,一定要在
components方法中进行注册才能使用。components内部是以[key: string]: value的格式书写
配置路径别名
当我们想要引用一个嵌套极深的文件时。需要../../../../utils/test,这对于开发是很友好的。 vue.config.js,该文件会和webpack的默认配置进行合并,从而实现对webpack的修改。而我们想要解决路径嵌套的问题,首先需要在webpack中进行配置。 第一步: 在vue.config.js中写入configureWebpack进行修改默认配置
const { defineConfig } = require("@vue/cli-service");
module.exports = defineConfig({
  transpileDependencies: true,
  configureWebpack: {
    resolve: {
      // 配置路径别名
      // @ 是内置已经配置好的路径别名:对应的是 src 的路径
      alias: {
        utils: "@/utils",
      },
    },
  },
});当我们配置完之后,就可以使用import {} from 'utils/test'进行直接使用。虽然配置生效了,但是 Vscode 是没有智能提示的,原因是 Vscode 并不知道配置了该路径别名。 第二步: 在js.config.json中进行配置。js.config.json是针对于 Vscode 的文件,以便给与更友好的提示
{
  "compilerOptions": {
    // ...
    "paths": {
      "@/*": ["src/*"],
      "utils/*": ["src/utils"]
    }
    // ...
  }
}
组件通信
父子组件通信
父子组件之间进行通信的两种方式:
父传子
组件最大的优势就是可复用性,不同的信息需要相似的结构去展示时,就可以将相似的结构封装为一个组件。并动态展示不同的数据信息。
props 接收
- 父组件引用子组件,在组件标签内部注册一些自定义的
attribute - 父组件给这些
attribute赋值,子组件通过attribute的名称接收和使用对应的值; - 子组件通过
props属性进行接收这些传递过来的属性。使用方式和data一致
- 父组件传递给子组件
<template>
  <h1>这里是父组件</h1>
  <InfoItem name="张三" sex="男" age="18" />
  <InfoItem name="李四" sex="女" age="20" />
  <InfoItem />
</template>
<script>
  import InfoItem from "./components/InfoItem.vue";
  export default {
    name: "App",
    components: {
      InfoItem,
    },
  };
</script>- 子组件接收数据
<template>
    <ul>
        <li>姓名:{{ name }}</li>
        <li>性别:{{ sex }}</li>
        <li>年龄:{{ age }}</li>
    </ul>
</template>

<script>
export default {// 必须通过 props 接收
    props: ['name', 'sex', 'age']
}
props 的接收方式
Props 有两种常见的用法:
-
方式一:字符串数组,数组中的字符串就是
attribute的名称; -
方式二:对象类型,对象类型我们可以在指定
attribute名称的同时,指定它需要传递的类型、是否是必须的、默认值等等;
数组写法
数组类型只能接收,不能对接收到的值进行限制,比如,要求传入的值必须是 Array,必须为 Number 类型
export default {
  props: ["name", "sex", "age"],
};
对象写法
常用写法:
export default {
  props: {
    // 限制 name 为 字符串,若不传 name,则显示 默认值 default
    name: {
      type: String,
      default: "我是默认Name",
    },
    // sex 属性为必传项
    sex: {
      type: String,
      default: "人妖",
      required: true,
    },
    // 仅仅限制 age 为 数字类型
    age: Number,
  },
};
当子组件要求
age字段必须为数字时,父组件的<InfoItem age="18" />就需要改为<InfoItem :age="18" />
props 对象写法拓展
-
type 的类型有:
String、Number、Boolean、Array、Object、Date、Function、Symbol -
对象类型常用写法汇总:
export default { props: { A: String, // 基础的类型检查(null 和 undefined 会通过任何类型验证) B: Number, // 多个可能的类型 C: [String, Number], // 必填的字符串 D: { type: String, required: true, }, // 带有默认值的数字 E: { type: Number, default: 100, }, }, }; -
对象类型其它写法汇总:
export default { props: { // 带有默认值的对象 A: { type: Object, // 对象 或 数组 默认值必须从一个工厂函数中获取 // 缩写:default: ()=> ({ message: "hello" }) default() { return { message: "hello" }; }, }, // 自定义验证函数 B: { validator(value) { // 这个值必须匹配下列字符串中的一个 return ["message", "warning", "danger"].includes(value); }, }, // 具有默认值的函数 C: { type: Function, // 与对象默认值不同,这不是一个工厂函数-----这是一个用作默认值的函数,这个函数就是默认值,而非返回值 default() { return "Default function"; }, }, }, }; -
props 的大小写命名: HTML 中的
attribute名是大小写不敏感的,所以浏览器会把所有大写字符解释为小写字符;这意味着当你使用 DOM 中的模板时,attribute使用驼峰命名和短横线连接命名都可以,但props接收处,必须是驼峰命名<InfoItem messageInfo="张三" /> <!-- 等价于 --> <InfoItem message-info="张三" />
非 props 的 Attribute(了解)
-
什么是非 Prop 的 Attribute 呢?当我们传递给一个组件某个属性,但是该属性并没有定义对应的
props或者emits时,就称之为 非 Prop 的 Attribute;常见的包括class、style、id属性等;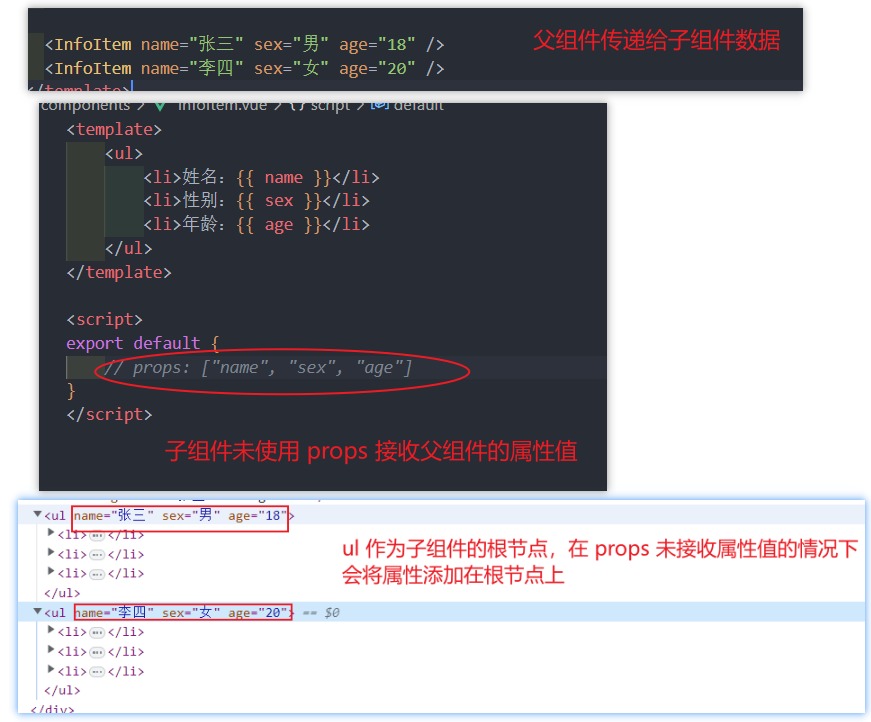
-
禁用 Attribute 继承禁止非 props 的 attribute 添加到子组件根节点上,可以在使用
inheritAttrs: false来禁止export default { inheritAttrs: false, // props: ["name", "sex", "age"] }; -
指定某个节点继承
attribute若要指定某个节点继承父组件的非 props 的attribute,可以使用$attrs来访问所有的 非 props 的attribute属性<!-- <h2 age="18"></h2> --> <h2 :age="$attrs.age"></h2> <!-- <h2 name="张三"></h2> --> <h2 :name="$attrs.name"></h2> <!-- <h2 class="name age sex"></h2> --> <h2 :class="$attrs"></h2>
子传父
当子组件有一些事件触发,比如子组件中发生了点击,父组件需要切换不同的内容,或者子组件有一些内容需要传递给父组件时,使用子传父。
$emits 使用
**案例:**父组件显示counter值,子组件内部的按钮点击时,父组件需要更新counter值 **思路:**给按钮绑定点击事件,当点击时,我们需要去通知父组件更改counter的值,父组件在得到通知后,需要做出对应的操作去完成此次响应。
- 给按钮绑定点击事件
@click="btnClick(1),当点击时,我们可以拿到点击需要加减的值count - 拿到之后,我们需要把这个值告诉父组件,让其加减这个值
count,使用$emit$emit可以接收两个参数,(参数 1:自定义事件,参数 2:传递给父组件的值)
<!-- AddCount.vue -->
<template>
  <div class="add">
    <h4>Add子组件</h4>
    <button @click="btnClick(1)">点击+1</button>
    <button @click="btnClick(5)">点击+5</button>
    <button @click="btnClick(10)">点击+10</button>
  </div>
</template>

<script>
  export default {
    methods: {
      btnClick(count) {
        // 让子组件发出一个自定义事件
        // 参数1:自定义的事件名称,参数2:传递的参数
        // 当触发 addClick 方法时,addClick会得到 count
        this.$emit("addClick", count);
      },
    },
  };
</script>- 父组件需要在子组件上绑定自定义事件,即
$emit的第一个参数addClick,书写格式和@click=""基本一致 - 绑定完成后,等号右侧就和
@click一样,是一个需要触发的事件handleClick,毕竟子组件通知父组件后,父组件需要做出相应的操作 handleClick会默认得到子组件传递过来的count,可以直接拿到count值,此时就可以进行加减操作
<!-- App.vue -->
<template>
  <div class="parent">
    <h1>父组件Count:{{ counter }}</h1>
    <!-- addClick 就是 $emit 中的第一个参数 handleClick 就是 需要做出操作的函数 -->
    <AddCount @addClick="handleClick" />
  </div>
</template>

<script>
  import AddCount from "./components/AddCount.vue";

  export default {
    name: "App",
    data() {
      return {
        counter: 0,
      };
    },
    components: { AddCount },
    methods: {
      // 父组件接收子组件传递过来的数据,并作出操作完成此次通知
      handleClick(count) {
        console.log("子组件传递过来的count", count);
        this.counter += count;
      },
    },
  };
</script>
内部其实是监听按钮的点击,点击之后通过
this.$emit的方式发出去事件
[!ATTENTION] 切勿通过 props 将 count 值传递给子组件,让子组件进行修改,这违反了单向数据流原则
自定义事件的参数和验证(了解)
emits是在 Vue3 中新增的,我们可以把所有需要通知的事件写在emits中,可以提高代码的可读性,在 Vscode 中在子组件标签上写这些自定义事件会有代码提示
export default {
  // 1、数组语法
  // emits: ["addClick"],
  // 2、对象语法,可以对参数进行验证
  emits: {
    addClick: function (count) {
      if (count <= 5) return true;
      return false;
    },
  },
  methods: {
    btnClick(count) {
      this.$emit("addClick", count);
    },
  },
};
当自定义验证生效时,控制台会报出警告,说是一个校验失败的自定义事件

非父子组件通信
在开发中,我们构建了组件树之后,除了父子组件之间的通信之外,还会有非父子组件之间的通信。传递的层级过深时,使用Provide和Inject
- 主要两种方式:
- 全局事件总线;
- Provide/Inject
Provide Inject
基本使用:
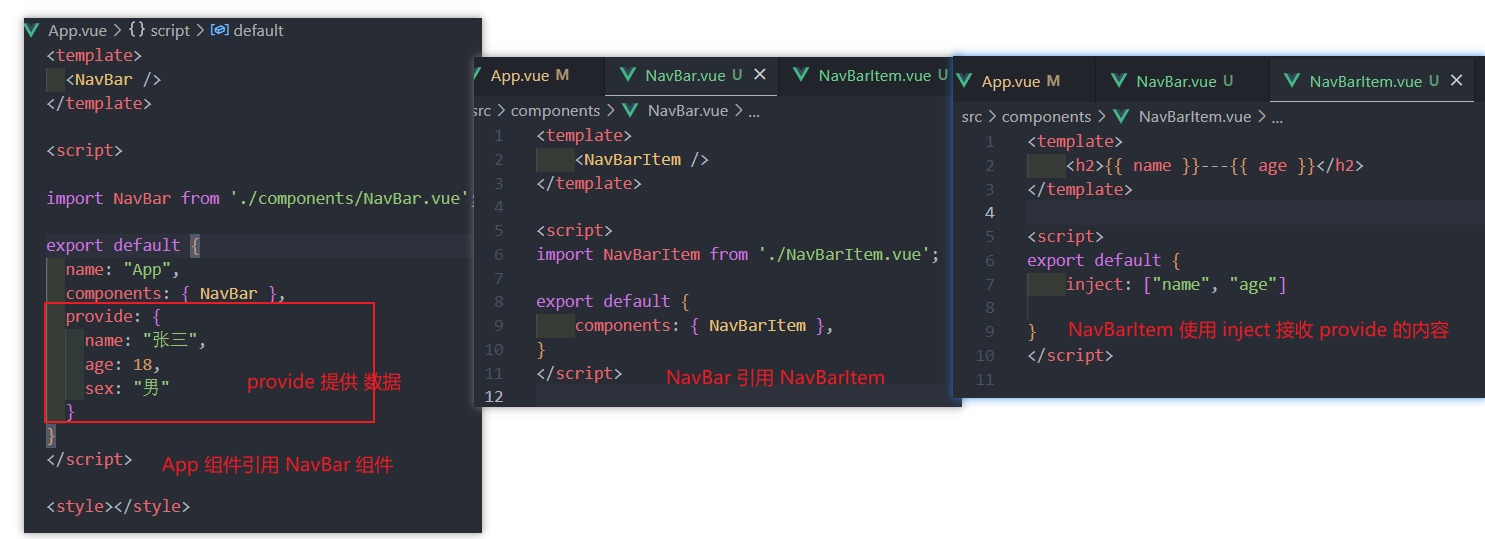
Provide 函数写法
如果Provide中提供的一些数据是来自 data,那么我们可能会想要通过 this 来获取
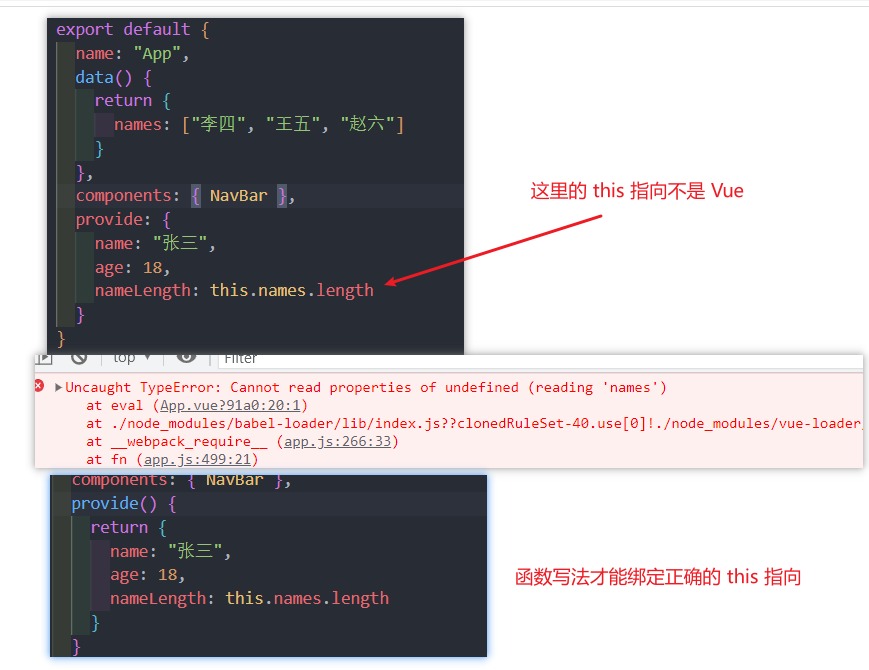
provide 一般都写成函数写法
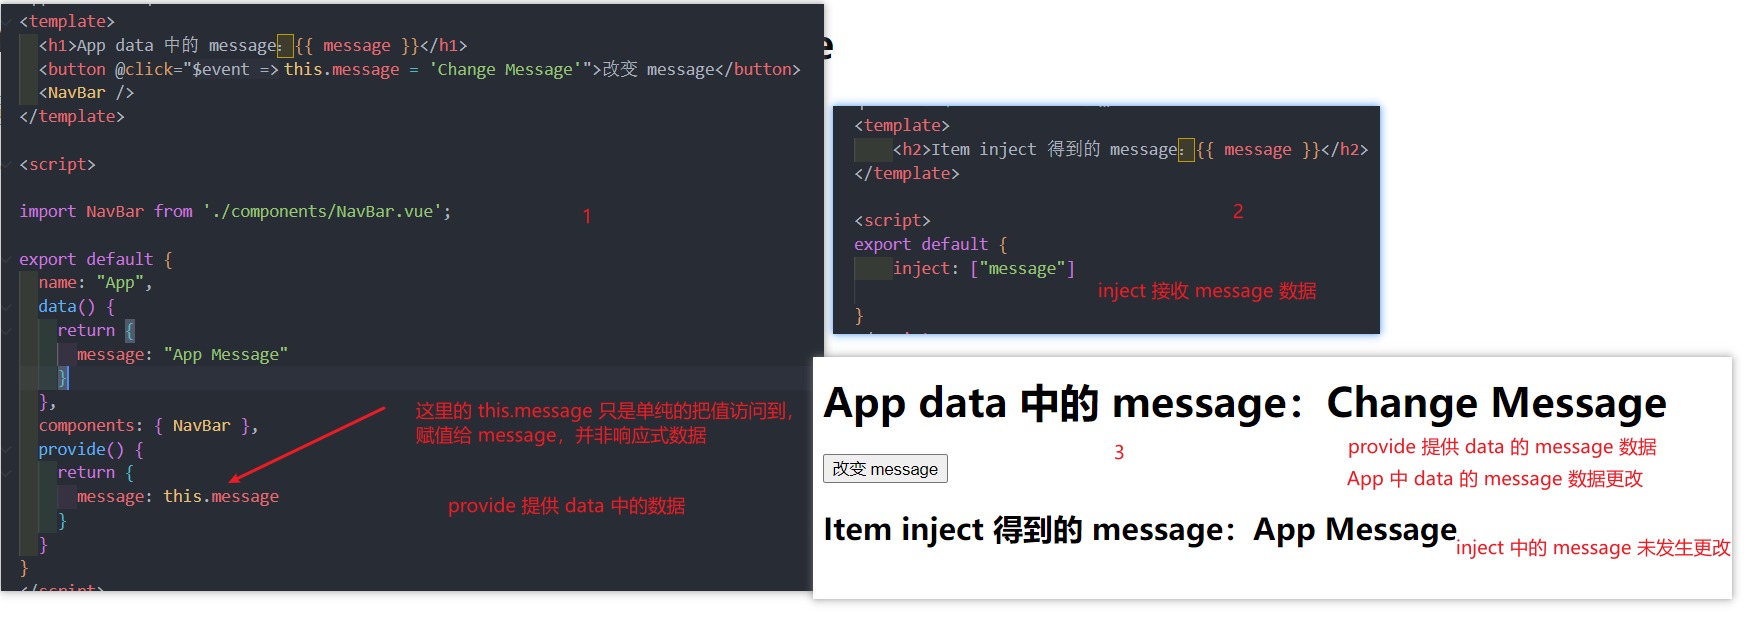
Provide 响应式数据
当我们使用 provide 给子组件传递数据时,我们更希望该数据是响应式的
解决方法:使用computed
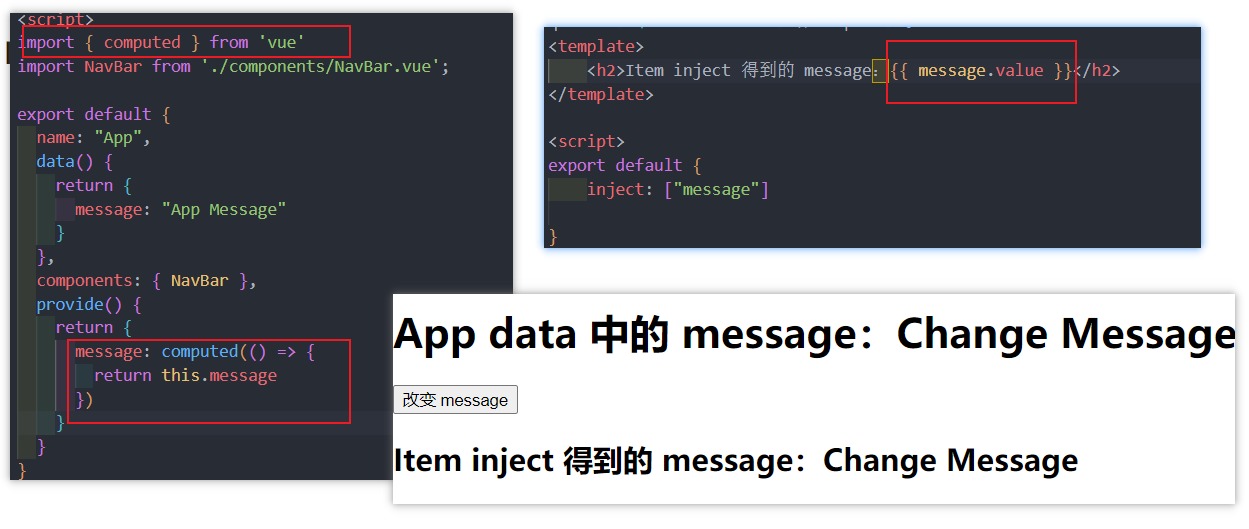
computed是 vue3 的新特性,且computed返回的是一个ref对象,需要取出其中的value来使用
事件总线
在 Vue2 中,官方内置了eventbus事件总线,但 Vue3 从实例中移除了 $on、$off、 $once 方法,所以我们如果希望继续使用全局事件总线,要通过第三方的库:
- Vue3 官方有推荐一些库,例如
mitt或tiny-emitter
Vue2 全局事件总线
-
初始化
// main.js // 入口文件加载时,直接在 VueComponent.propotype 上添加 $bus 实例 // 为了方便起见,可以把 EventBus 实例化为 $bus var EventBus = new Vue(); Object.defineProperties(Vue.prototype, { $bus: { get: function () { return EventBus; }, }, }); -
发送事件 A 页面点击,通知 B 页面
<!-- A.vue --> <template> <button @click="sendMsg()">-</button> </template> <script> export default { methods: { sendMsg() { this.$bus.$emit("toBMsg", "来自A页面的消息"); }, }, }; </script> -
接收事件
<!-- B.vue --> <template> <p>{{ msg }}</p> </template> <script> export default { data() { return { msg: null, }; }, mounted() { // mounted 页面挂载完成就开始监听事件 // 监听的事件触发,则会接收到 发送过来的 数据 ths.$bus.$on("toBMsg", (msg) => { // A发送来的消息 this.msg = msg; }); }, }; </script> -
移除事件监听通常在当前页面销毁时,移除该页面的事件监听
this.$bus.$off('aMsg')
$emit接收两个参数this.$bus.$emit(event: string, callback: Function),参数一:自定义事件名,参数二:回调函数,若无特殊处理,可简写传递参数$on接收两个参数this.$bus.$on(eventName: string, callback: Function),参数一:需要监听的自定义事件名,参数二:回调函数,函数内部可接收发送方的数据。一般用在created | mounted生命周期中$off接收两个参数this.$bus.$off(event: string | Array<string>, callback: Function),参数一:需要移除的自定义事件名,参数二:回调函数。一般用在unmounted生命周期中- 如果没有提供参数,则移除所有的事件监听器
- 如果只提供了事件,则移除该事件所有的监听器
- 如果同时提供了事件与回调,则只移除这个回调的监听器
推荐在写 $on 和 $off 搭配使用。
插槽(slot)
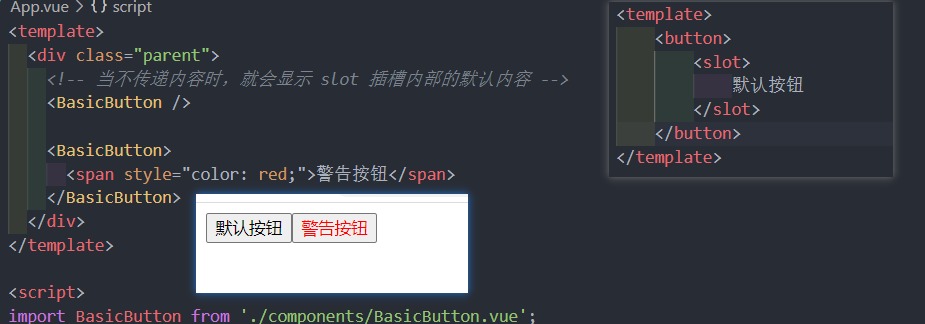
Vue 中将 <slot> 元素作为承载分发内容的出口;在封装组件中,使用 特殊的元素 <slot> 就可以为封装组件开启一个插槽;该插槽插入什么内容取决于父组件如何使用;
使用插槽
基本使用
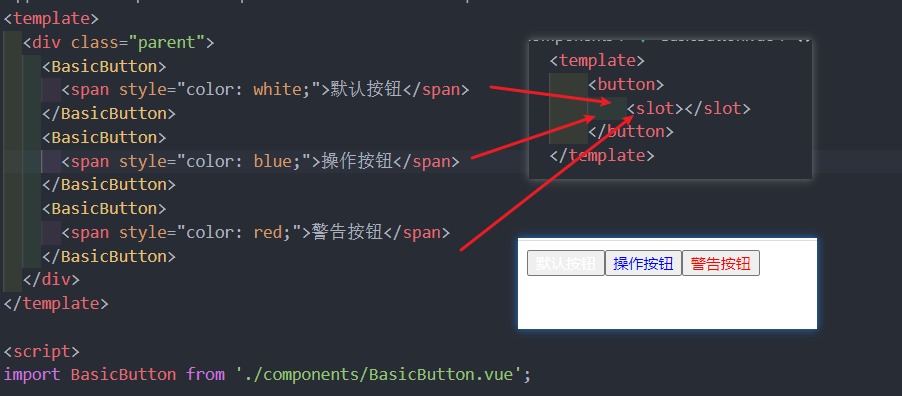
默认插槽内容
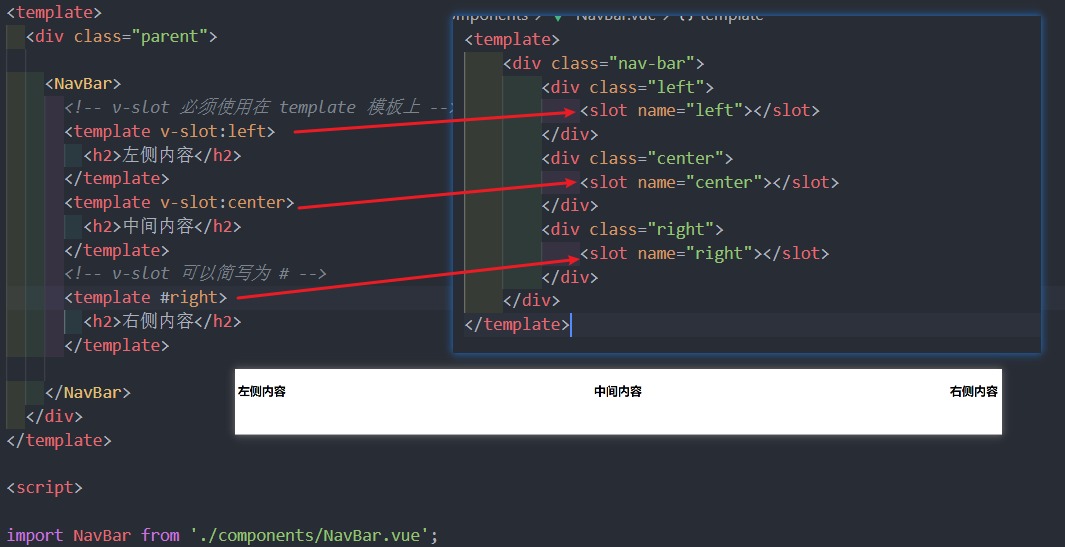
具名插槽
当有一个组件有多个插槽时,为了防止插槽使用混乱,需要对其进行命名
- 顾名思义就是给插槽起一个名字,
<slot>元素有一个特殊的attribute:name。 - 一个不带 name 的 slot,会带有隐含的名字 default
- 具名插槽
v-slot可以简写为# v-slot必须写在<template></template>标签上
最常用的是第三种写法
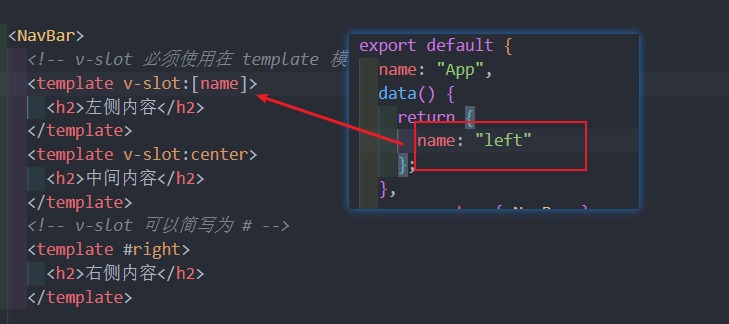
动态插槽名
我们可以通过 v-slot:[dynamicSlotName] 方式动态绑定一个名称
插槽难点
认识渲染作用域
- 在 Vue 中有渲染作用域的概念:
- 父级模板里的所有内容都是在父级作用域中编译的,就算最终内容是渲染在子模板中,只要内容是在父模板,他的作用域就是父模板
- 子模板里的所有内容都是在子作用域中编译的,父子模板之间的数据时完全无法直接互相使用的
认识作用域插槽
为什么要使用作用域插槽?举例:
- 当子组件会接收
list 数组进行循环时,如果使用插槽,内部的循环显示的标签是固定的,
<template>
  <div class="nav-bar">
    <template v-for="item in list" :key="item.id">
      <div class="item">
        <!-- 正常写法 -->
        <span>{{ item.title }}</span>
        <!-- 插槽写法 -->
        <!-- 这种写法是不成功的,父组件插入插槽中的内容会循环,导致的结果就是每一个 item 的内容一样 -->
        <!-- 原因是:这里的 item 父组件是访问不到的,父组件传递过来的内容,会直接把 slot 的默认内容(循环项)替换掉 -->
        <!-- <slot><span>{{ item.title }}</span></slot> -->
      </div>
    </template>
  </div>
</template>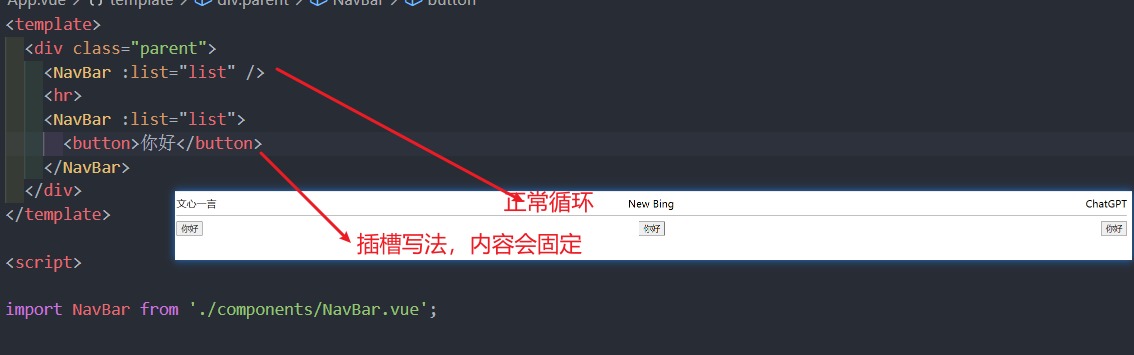
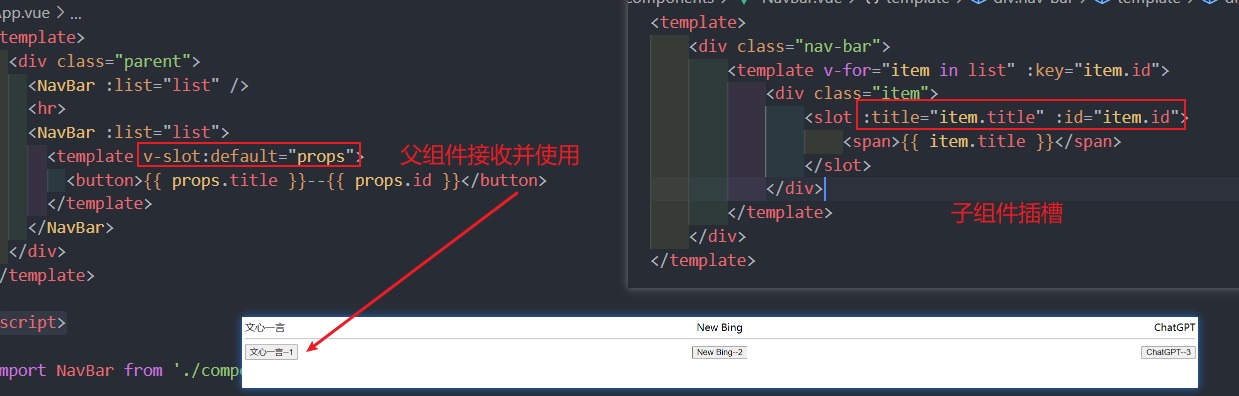
提问: 在这种情况下,该如何在子组件有插槽的循环中插入循环项的自定义内容 思路: 将插槽的当前项传递给父组件,供父组件访问
- 在
slot标签绑定自定义attribute将当前循环项插槽的数据传递给父组件,父组件通过v-slot:default="xxx"(简写#default="xxx")接收,xxx代表的是传递给父组件的所有数据,所以是一个对象,可以通过xxx.id、xxx.title的格式访问这些数据。
认识独占默认插槽的缩写
-
如果我们的插槽是默认插槽
default,那么在使用的时候v-slot:default="props"可以简写为 v-slot=“props” -
如果我们的插槽只有默认插槽时,组件的标签可以被当做插槽的模板来使用,我们就可以将 v-slot 直接用在组件上
-
如果我们有默认插槽和具名插槽,那么按照完整的 template 来编写
-
只要出现多个插槽,请始终为所有的插槽使用完整的基于
<template>的语法。具名插槽<!-- 正常写法 --> <NavBar :list="list"> <template v-slot:default="props"> <button>{{ props.title }}--{{ props.id }}</button> </template> </NavBar> <!-- v-slot 通用简写 --------最常用 --> <NavBar :list="list"> <template #default="props"> <button>{{ props.title }}--{{ props.id }}</button> </template> </NavBar> <!-- 插槽时默认插槽 default,v-slot:default="props" 简写为 v-slot="props" --> <NavBar :list="list"> <template v-slot="props"> <button>{{ props.title }}--{{ props.id }}</button> </template> </NavBar> <!-- 只有默认插槽时,可以省略 template 模板,将 v-slot 写在组件上 --> <NavBar :list="list" v-slot="props"> <button>{{ props.title }}--{{ props.id }}</button> </NavBar>
生命周期

- 创建(组件实例初始化)阶段
- beforeCreate:开始创建组件实例
- created(重要):组件实例创建完成。发送网络请求、事件监听、this.$watch
- 挂载(template 模板编译,数据渲染)阶段
- beforeMount:DOM 开始挂载
- mounted(重要):元素已被挂载。获取 DOM、使用 DOM
- 更新(data 数据变化更新 el 节点)阶段
- beforeUpdate:根据最新数据,预生成新的 VNode
- update:新的真实 DOM 已经更新完毕
- 销毁阶段
- beforeUnmout:组件预卸载
- unmounted(相对重要):组件实例销毁。回收操作、取消事件监听、定时器等
多组件 lifecycle 执行顺序:
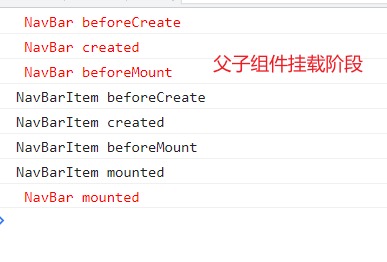
父子组件挂载阶段
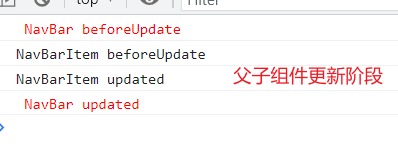
父子组件更新阶段
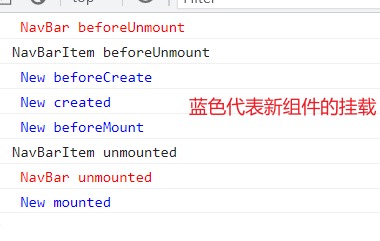
父子组件卸载阶段
$refs
- 在 Vue 开发中,想要直接获取到元素对象或者子组件实例,可以给元素或者组件绑定一个
ref的attribute属性 - 组件实例有一个
$refs属性:它一个对象 Object,持有注册过 ref attribute 的所有 DOM 元素和组件实例。
- 标签或组件内部通过写入
ref="xxx"绑定ref, - 通过
this.$refs.xxx访问到对应的原生 DOM 节点
<template>
  <!-- ref 绑定元素,获取到的是原生DOM节点 -->
  <h1 ref="titleRef">{{ title }}</h1>

  <!-- ref 绑定组件,获取到的是组件实例 -->
  <MyRef ref="componentRef" />

  <button @click="btnClick">点击</button>
</template>

<script>
  import MyRef from "./components/MyRef.vue";

  export default {
    name: "App",
    data() {
      return {
        title: "Hello World",
      };
    },
    components: { MyRef },

    methods: {
      btnClick() {
        // 获取到 元素节点,可以通过 .style、.innerHTML 等操作原生 DOM 的方式进行操作
        console.log(this.$refs.titleRef);

        // this.$refs.componentRef 就是组件实例,即 组件的 this
        console.log(this.$refs.componentRef);
        // 所以可以直接访问 data 中的数据
        console.log(this.$refs.componentRef.message);
        // 绑定组件可以通过 this.$refs.componentRef.$el 拿到组件的根元素
        console.log(this.$refs.componentRef.$el);
        // 若组件由多个根节点,获取到的是第一个 node 节点

        // console.log(this.$parent)   // 访问当前组件的父组件
        // console.log(this.$root)    // 获取根组件
        // Vue3 中移除了 $children
      },
    },
  };
</script>

<style></style>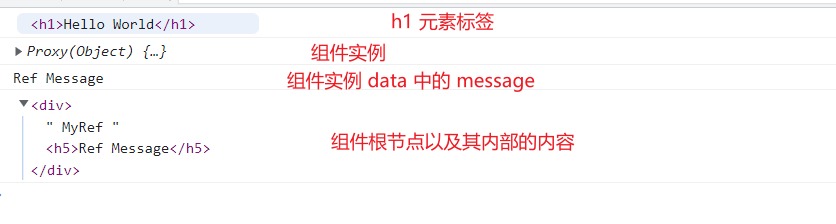
当
ref绑定元素时,this.$refs.xxx获取到的是 DOM 节点。当ref绑定 组件时,this.$ref.xxx获取的是该组件的组件实例,可以直接访问内部的数据(data 中的数据,methods 中的方法等所有能够通过 this 访问的)
component 动态组件
基本使用
当我们需要动态显示组件(组件的切换)时,首先想到的就是v-if,这种当组件判断过多时会显得臃肿,可以尝试第二种component动态组件标签
component标签内部通过特殊的attribute:is,来动态展示组件,is内部就是需要显示的组件名称,前提是组件必须是全局组件或已被注册的局部组件
<template>
  <div id="app">
    <div class="navbar">
      <template v-for="(item, index) in nav" :key="index">
        <div
          :class="{ active: currntIndex === index }"
          @click="btnClick(index)"
        >
          {{ item.title }}
        </div>
      </template>
    </div>
    <!-- 方式一:普通写法,通过 v-if 判断当前需要显示的组件 -->
    <MyHome v-if="currntIndex === 0" />
    <MyAbout v-else-if="currntIndex === 1" />
    <MyCenter v-else />
    <!-- 方式二:component 动态组件 -->
    <component :is="nav[currntIndex].component" />
  </div>
</template>

<script>
  import MyAbout from "./components/MyAbout.vue";
  import MyCenter from "./components/MyCenter.vue";
  import MyHome from "./components/MyHome.vue";

  export default {
    name: "App",
    components: { MyHome, MyAbout, MyCenter },
    data() {
      return {
        nav: [
          { title: "首页", component: "MyHome" },
          { title: "中心", component: "MyCenter" },
          { title: "关于", component: "MyAbout" },
        ],
        currntIndex: 0,
      };
    },
    methods: {
      btnClick(index) {
        this.currntIndex = index;
      },
    },
  };
</script>
动态组件传值
组件通信,可以直接在 <component />标签中传值,此时component标签可以当做组件进行通信
<component :is="nav[currntIndex].component" @sendMsg="getMsg" :msg="msg" />keep-alive
缓存组件
在切换组件后,切换前的组件会被销毁掉,再次回来时会重新创建组件,所有的元素及状态都会重新编译,若需要在切换组件时依旧让组件不被销毁,可以使用keep-alive
-
keep-alive内部包裹的组件默认都会被缓存<KeepAlive> <!-- 这里的组件当切换时,不会销毁和重新创建 --> <component :is="nav[currntIndex].component" /> </KeepAlive> -
include只有名称匹配的组件会被缓存,写法:string | RegExp | Array<string>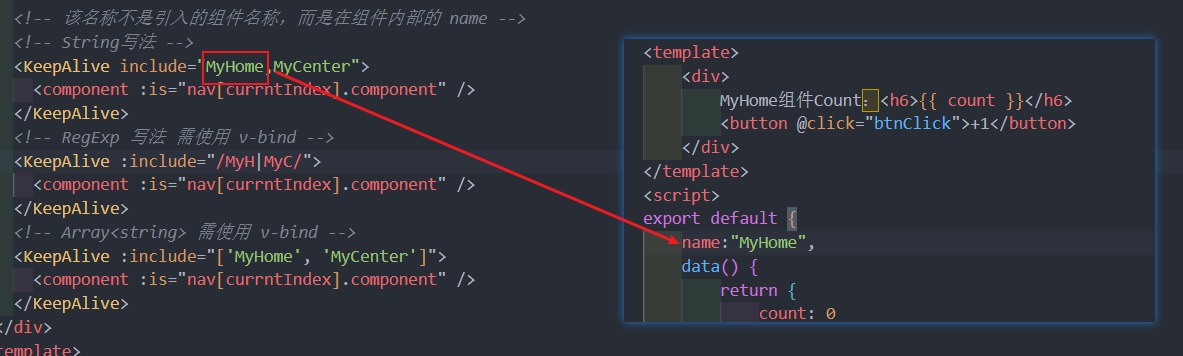
-
exclude任何名称匹配的组件都不会被缓存,用法和include一致 -
最多可以缓存多少组件实例,一旦达到这个数字,那么缓存组件中最近没有被访问的实例会被销毁。写法:
number | string
缓存生命周期
- 对于缓存的组件来说,再次进入时,是不会执行
created或者mounted等生命周期函数的:- 但是有时候我们确实希望监听到何时重新进入到了组件,何时离开了组件;
- 可以使用
activated和deactivated这两个生命周期钩子函数来监听;
异步组件
对于某些组件若需要通过异步的方式来进行加载(目的是可以对其进行分包处理),Vue 中提供了一个函数:defineAsyncComponent。
-
defineAsyncComponent 接受两种类型的参数:
- 类型一:工厂函数,该工厂函数需要返回一个
Promise对象
import { defineAsyncComponent } from "vue"; const AsyncMyHome = defineAsyncComponent(() => import("@/components/MyHome.vue") ); export default { name: "App", components: { AsyncMyHome }, };- 类型二:接受一个对象类型,对异步函数进行配置;
const AsyncMyHome = defineAsyncComponent({ // 工厂函数 loader:()=>import("@/components/MyHome.vue"), // 加载过程中显示的组件 loadingComponent: Loading, // 加载失败时显示的组件 errorComponent: Error, // 在显示 loading 组件之前的延迟 默认值:200ms delay: 2000, // 如果提供了 timeout,并且 加载组件 的时间超过了设定值,将显示 错误组件 // 默认值:Infinity (永不超时,单位ms) timeout:1000 * 60, // 定义组价是否可挂起 默认值:true suspensible: true }); - 类型一:工厂函数,该工厂函数需要返回一个
组件的 v-model
在 input 中可以使用v-model来完成双向绑定。vue 也支持在组件上使用v-model;
基本使用
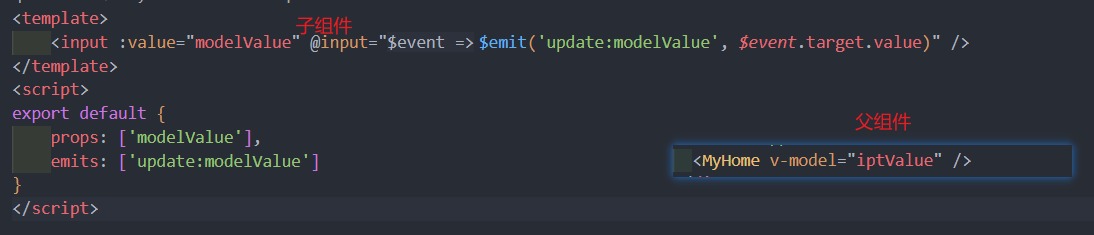
<MyHome v-model="message" />
<!-- 等价于 -->
<MyHome :modelValue="message" @update:modelValue="message = $event" />
组件 v-model 实现
多个 v-model 绑定
<UserName v-model:firstName="first" v-model:lastName="last" /><template>
<input
type="text"
:value="firstName"
@input="$emit('update:firstName', $event.target.value)"
/>
<input
type="text"
:value="lastName"
@input="$emit('update:lastName', $event.target.value)"
/>
</template>
<script>
export default {
props: ["firstName","lastName"]
emits: ["update:firstName", "update:lastName"],
};
</script>Mixin
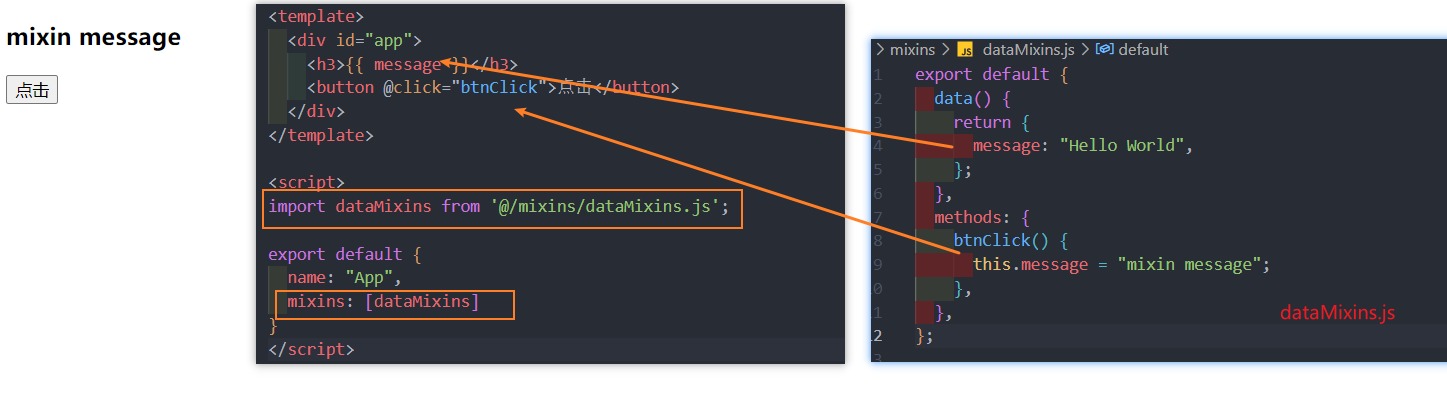
- 组件和组件之间有时候会存在相同的代码逻辑,可以使用
mixins对相同的代码逻辑进行抽取 - 有
mixins对象的选项将被 混合 进入该组件本身的选项
基本使用
Mixin 的合并规则
当mixins对象中的选项和组件对象中的选项发生了冲突,Vue 分成不同的情况来进行处理
- data 函数的返回值对象冲突
- 保留组件自身的数据
- 生命周期钩子函数冲突
- 生命周期的钩子函数会被合并到数组中,都会被调用
- 值为对象的选项,例如
methods、components 和 directives,将被合并为同一个对象- 比如都有 methods 选项,并且都定义了不同的方法,那么它们都会生效(合并);
- 但是如果对象的 key 相同,那么会取组件对象的键值对。
- 比如
mixins的methods中定义了btnClick,组件的methods中也定义了btnClick,则最终会使用组件内部的btnClick
- 比如
全局混入 mixin
组件中的某些选项,是所有的组件都需要拥有的,那么这个时候我们可以使用全局的 mixin
const app = createApp(App);
app.mixin({
  create() {
    console.log("global mixin created");
  },
});全局混入,一旦注册,将会影响到所有的组件