所有笔记内容基于网络上的黑马视频课程自行整理,如有侵权,请联系删除…
Table of contents
面向对象
基础
this 关键字
跟前端的 this 差不多,就近原则。
- 当局部变量和成员变量重名时,可以通过 this 访问成员变量
- 访问成员变量,当不涉及重名问题时, this 可以省略
- 调用成员方法,this 可以直接省略
public class Test {
  private String name;

  public void setName(String name) {
    System.out.println(this.name)
    this.name = name;
  }

  public void ignoreThis() {
    // 省略 this 也可以
    System.out.println(name);
    setName("张三");
  }
}- this 代表当前类的地址引用。
public class Person {
 private String name;

 public void printThis() {
   System.out.println(this);
 }
}

public class Test {
 public static void main(String[] args) {
   Person person = new Person();
   System.out.println(person); // Person@1b6d3586
   person.printThis(); // Person@1b6d3586
 }
}
构造方法
不写的话 Java 会默认生成一个无参构造方法,可以 IDEA 右键 Generate 快速生成,后边有 lombok 就不这么麻烦了。
- 无返回类型,无 void,无 return 值
- 会在创建对象时调用。
public class Person {
  String name;
  int age;

  // 无参和有参其实就是重载
  public Person() {
    System.out.println("无参构造方法");
  }

  public Person(String name, int age) {
      this.name = name;
      this.age = age;
      System.out.println("有参构造方法");
  }
}

public class Test {
  public static void main(String[] args) {
    Person person = new Person();
    System.out.println(person.name); // null 无参构造方法
    Person person1 = new Person("张三", 18)
    System.out.println(person1.name); // 张三 有参构造方法
  }
}
权限修饰符
| 修饰符 | 当前类中 | 当前包中 | 不同包的子类 | 不同包的非子类 |
|---|---|---|---|---|
| private | √ | |||
| (default) | √ | √ | ||
| protected | √ | √ | √ | |
| public | √ | √ | √ | √ |
protected 开发中基本用不到
// com.example.a;
public class Base {
    protected int value = 42;   // protected 成员
}

// com.example.a; 同包非子类
public class SamePackage {
    public void access(Base b) {
        System.out.println(b.value);  // ✅ 可以访问(同包)
    }
}
//  com.example.b; 不同包子类
public class Subclass extends Base {
    public void access() {
        System.out.println(value);     // ✅ 可以访问(子类继承)
    }
}
// com.example.b; 不同包非子类
public class NonSubclass {
    public void access(Base b) {
        // System.out.println(b.value); // ❌ 编译错误
    }
}
JavaBean
开发中的数据实体都用这个
- JavaBean 类的属性必须私有,并且提供 getter 和 setter 方法。
- JavaBean 类必须提供无参和有参构造方法。
static 关键字
- static 修饰的成员变量,被该类下的所有对象共享
- static 修饰的才可以通过
Student.name(直接类名访问无需 new) 访问静态成员变量并赋值(推荐) - 随着类加载而创建,优于对象存在。
Student.schoolName="清华大学"可以在new Student()之前赋值。
public class Student {
  public static String schoolName;
  public int age;
}

public class Test {
  public static void main(String[] args) {
    Student.schoolName = "清华大学";

    Student student = new Student();
    System.out.println(student.schoolName); // 清华大学

    Student student1 = new Student();
    System.out.println(student1.schoolName); // 清华大学
  }
}
注意事项:
- static 修饰的方法只能直接访问 static 修饰的成员变量
- static 静态方法内没有 this 关键字
高级
继承 extends
继承是面向对象三大特征之一,封装、继承、多态。
跟前端的 TS 差不多,子类 extends 父类,子类会继承父类的属性和方法(除了私有属性和方法),在实际场景中,需要继承的父类一般都是公共属性的基类。
- 当子类和父类存在同名成员变量时,直接访问到的是子类的成员变量(就近原则),如果想访问父类的,可以通过
super.变量名
public class Person {
  int sex="男"
}

public class Student extends Person {
  int sex="女";

  public void printSex() {
    int sex="未知";
    System.out.println(sex); // 未知
    System.out.println(this.sex); // 女
    System.out.println(super.sex); // 男
  }
}- 当子类和父类存在同名方法(方法名入参返回值都一致)时,子类可以用
@Override重写父类的方法,重写时,也必须保持方法名入参返回值都一致,不然报错。
public class Father {
  public void love() {
    System.out.println("三大件:手表、自行车、缝纫机");
  }
}

public class Son extends Father {
  @Override
  public void love() {
    System.out.println("三大件:房、车、钱");
  }

  // 方法名相同,但是入参/返回值不一致,就不属于重写,属于重载
  public void love(String gender){
    System.out.println("三大件:房、车、钱");
  }
}- 继承的一些访问特性
- 子类无法继承父类的构造方法
- 子类在初始化时,系统会自动调用父类的构造方法,父类构造方法早于子类构造方法执行,因为子类很有可能通过 super 访问父类的变量或方法
- 基于第 2 点,子类所有的构造方法,首行默认添加 super() 从而完成调用父类的构造方法
public class Father {
  public Father() {
    System.out.println("父类无参构造方法");
  }
}

public class Son extends Father {
  public Son() {
    //  super() // 默认添加
    System.out.println("子类无参构造方法");
  }
}

new Son(); // 打印顺序:父类无参构造方法 -> 子类无参构造方法
Object/Objects
Object
跟 js 一样,万物皆对象,Object 是所有类的父类,所有的类都继承了 Object 类。
- toString(): 返回对象的字符串或者地址
通过 System.out.println() 输出时,会自动调用 toString() 方法,一般 JavaBean 类都会重写 toString() 方法,返回对象的属性值。
- equals(): 判断两个对象是否相等
== 只适合比较基本类型值,判断两个对象是否相等,使用 a.equals(b),开发中,通常推荐重写 equals() 方法来自定义比较
Objects
Objects.equals(a, b): 判断两个对象是否相等,比Object.equals()更加安全,因为底层会自动处理空指针异常的情况Objects.isNull(a): 判断对象是否为 null(源码就是== null)
final 关键字
- final 关键字:修饰的类不能被继承,修饰的方法不能被重写,修饰的成员变量不能被修改(基本类型值不可改,引用类型引用地址不可改,类似
const)
final 修饰的成员变量,要么直接写值,要么在构造方法中赋值。final 修饰的变量时常量,命名规范上应该是 全大写单词之间 _ 连接。
抽象类 abstract
父类抽象类中只定义共性的行为,不定义具体的实现,abstract 修饰的方法所在的类必须是抽象类,子类要么也是抽象类,要么强制实现抽象方法。
// 比如每个人都有工作,但是每个人的工作并不一定一样
public abstract class Person {
    public abstract void work();
}

class PersonA extends Person {
    @Override
    public void work() {
        System.out.println("厨师");
    }
}

class PersonB extends Person {
    @Override
    public void work() {
        System.out.println("码农");
    }
}
抽象类注意事项:
- 抽象类不能实例化(不能 new,但是依然存在构造方法),只能被继承
- 抽象类中可以有抽象方法,也可以有普通方法
abstract 关键字冲突:
- final:被
abstract修饰的方法,强制要求子类重写,被final修饰的类不能被重写 - private:被
abstract修饰的方法,强制要求子类重写,被private修饰的方法不能被重写 - static:被
static修饰的方法可以类名调用,类名调用抽象方法没有意义
接口 interface
接口就是对行为的抽象(abstract),如果一个 class 类全都是对规则的定义(抽象类),那么这个类就可以改写成接口。
接口和抽象类一样,子类在实现(implements)接口时,必须实现接口中的所有抽象方法,要不然子类就也成为抽象类。
public abstract class Person {
  public abstract void work();
  public abstract void eat();
}

public interface Person {
  public abstract void work();
  public abstract void eat();
}
接口的特点:
- 接口不能实例化,因为是抽象类
- 接口内的成员变量会自动添加
public static final修饰符 - 接口内的方法只能是抽象方法(JDK8 可以通过
default修饰符,非强制子类实现,JDK9 可以使用private修饰,这种不会被子类实现),因为默认会添加public abstract修饰符 - 接口没有构造方法
- 类可以一次性实现多个接口,但是只能继承一个类
- 接口中如果有 static 修饰的静态方法,只能通过接口名调用
public interface Person {
  String NAME = "张三";

  private void fn() {} // JDK9 开始支持,不会被子类实现

  void work(); // 等价于 public abstract void work();

  // public void eat(){} // 报错
  // default void eat() {} // JDK8 显式添加 default 修饰符可以标记成**可选实现的抽象类**,子类可以不实现,也可以实现
}

// Person person = new Person(); // 报错 因为抽象
// Person.NAME = "李四"; // 报错 因为 final 修饰
System.out.println(Person.NAME);
如果方法的形参是一个 interface 接口,想要传入参数,就需要一个实现此 interface 的实现类。结合匿名内部类看
// Person 是一个 interface
interface Person{
  void eat();
}

public static void main(String[] args){
  usePerson();
}

public static void usePerson(Person p){
  p.eat(new Coder());
}

// interface 无法 new,只能通过实现类来传入
class Coder implements Person{
  @Override
  public void eat() {
    System.out.println("码农吃东西");
  }
}
多态
有以下特点的才是多态:
- 有继承/实现关系
- 有方法重写
- 父类引用指向子类对象
虽然在转换成父类时无法使用子类的特有方法,但是可以用 instanceof 来判断属于哪个子类,进而访问子类的特有方法。
public class Person {
  public void eat() {
    System.out.println("吃吃吃");
  }
}
// 有继承 有方法重写
public class Student extends Person {
  @Override
  public void eat() {
    System.out.println("不仅吃还喝");
  }
}

Student student = new Student(); // 子类引用指向子类对象
Person person = new Student(); // 父类引用指向子类对象
多态的应用场景
abstract class Animal {
  void eat();
}
class Dog extends Animal {
  @Override
  public void eat() {
    System.out.println("狗吃肉");
  }
}
class Cat extends Animal {
  @Override
  public void eat() {
    System.out.println("猫吃鱼");
  }
}

public void useAnimal(Animal animal){
  animal.eat();
}

// Usage
useAnimal(new Dog());
useAnimal(new Cat());
内部类
- 成员内部类:类中套类,用处不大,常用于 JavaBean 实体类的嵌套
- 静态内部类:鸡肋,用不到
// 成员内部类
class Outer{
  class Inner{}
}
Outer.Inner oi= new Outer.new Inner()

// 静态内部类
class Outer{
  static class Inner{}
}

Outer.Inner oi = new Outer.Inner();- 匿名内部类(重要,结合 Lambda 表达式)
interface Person{
  void eat();
}

public static void main(String[] args){
  // 没有 implements Person,直接 new Person(){} 没有名字,这就是一个匿名内部类
  // 将 继承(extends)/实现(implements)、方法重写、创建对象合并成一行代码
  new Person(){
    @Override
    public void eat() {
      System.out.println("匿名内部类在吃");
    }
  }.eat(); // new 之后就是一个对象了,可以调用方法,只是不直观
}
常用举例:
interface Person{
  void eat();
}

// 👍 new Person 的时候 IDEA 会自动补全 Override 的方法
// 重写的方法少了这样写是可以的,如果太多尽量抽出去
usePerson(new Person(){
  @Override
  public void eat() {
    System.out.println("匿名内部类在吃");
  }
})

public static void usePerson(Person person){
  person.eat();
}
Lambda 表达式
Lambda 表达式是 JDK8 引入,只能简化函数式接口的匿名内部类写法。(匿名内部类被重写的方法形参)-> {}
满足以下条件的是函数式接口:
- 必须是接口 interface,接口中有且只有一个抽象方法
- 通常会添加注解
@FunctionalInterface,不加也可以,加是为了校验是否满足,不报错就说明满足函数式接口的条件,反之则不满足
@FunctionalInterface
interface Person{
  void eat();
}

public static void main(String[] args){
  // 匿名内部类写法
  usePerson(new Person(){
    @Override
    public void eat() {
      System.out.println("匿名内部类在吃");
    }
  })

// eat 没有形参,因此为空
  usePerson(() -> {
    System.out.println("匿名内部类在吃");
  })
  // 由于只有一行代码,因此可以省略 {},跟 JS 的箭头函数差不多
  usePerson(() -> System.out.println("匿名内部类在吃"));
}

public static void usePerson(Person person){
  person.eat();
}
匿名内部类在警经过编译之后,会生成单独的字节码文件,而 Lambda 不会。
常用 API
String
String str = "Hello";
System.out.println(str.length()); // 5
System.out.println(str.charAt(0)); // H
System.out.println(str.toCharArray()); // [H, e, l, l, o]
System.out.println(str.equals("Hello")); // true
System.out.println(str.equalsIgnoreCase("hello")); // true
System.out.println(str.substring(0, 2)); // He
System.out.println(str.substring(2)); // llo
System.out.println(str.replace('l', 'x'));
System.out.println(str); // Hello 不会更改原始字符串
System.out.println(str.toUpperCase()); // HELLO
System.out.println(str.toLowerCase()); // hello
System.out.println(str.startsWith("H")); // true
System.out.println(str.endsWith("o")); // true
System.out.println(str.contains("el")); // true
System.out.println(str.indexOf('l')); // 2
System.out.println(str.lastIndexOf('l')); // 2
System.out.println(str.isEmpty()); //  false
System.out.println(str.hashCode()); // 69609650
System.out.println(str.concat(" World")); // Hello World
System.out.println(str.split(" / ")); // [Ljava.lang.String;@2f4d3709
ArrayList
- add 若以索引添加,索引超出 ArrayList.size() 的范围则会抛出异常
- remove 若索引超出 ArrayList.size() 的范围则会抛出异常
- set 更改的索引对应值必须存在
ArrayList<Object> arrayList = new ArrayList<>();
arrayList.add("A");
arrayList.add(1, "B"); // 此时数组为 {'A', 'B'},index 不能大于 数组集合 size
System.out.println(arrayList.get(1)); // 输出 B
System.out.println(arrayList.size()); // 输出 2
arrayList.remove("A"); // 此时数组为 {'B'}
arrayList.remove(0); // 此时数组为 {}
arrayList.add("A1"); // 此时数组为 {'A1'}
arrayList.set(0, "C"); // 此时数组为 {'C'},set 的索引必须存在
StringBuilder/StringBuffer
StringBuilder更适合频繁修改字符串的场景,性能比 String 更高。StringBuffer和StringBuilder用法完全一样。StringBuilder线程是不安全的,StringBuffer线程安全。
StringBuilder sb = new StringBuilder();
System.out.println(sb.append("Hello"));
System.out.println(sb.append("World")); // 输出 HelloWorld
System.out.println(sb.insert(2, "Java")); // 输出 HeJavalloWorld
System.out.println(sb.delete(2, 5)); // 输出 HealloWorld 删除索引 2~5不包含5索引的字符
System.out.println(sb.reverse()); // 输出 dlroWollaeH 反转字符串
StringJoiner
在循环拼接字符串时,StringJoiner 的代码会更加简洁。
// StringBuilder 拼接字符串
StringBuilder sb = new StringBuilder();
sb.append("[");
for (int i = 0; i < 10; i++) {
    if (i == 9) {
        sb.append(i);
    } else {
        sb.append(i).append(",");
    }
}
sb.append("]");
System.out.println(sb);

// StringJoiner 拼接字符串
StringJoiner sj = new StringJoiner(",", "[", "]");
for (int i = 0; i < 10; i++) {
    sj.add(i + "");
}
System.out.println(sj);
Math System Runtime BigDecimal
Math 部分 API 跟 js 差不多。
| API | 描述 |
|---|---|
| Math.abs(x) | 返回 x 的绝对值 |
| Math.ceil(x) | 返回 x 的最接近的整数,且不小于 x(向上取整) |
| Math.floor(x) | 返回 x 的最接近的整数,且不大于 x(向下取整) |
| Math.max(x,y) | 返回 x 和 y 中的最大值 |
| Math.min(x,y) | 返回 x 和 y 中的最小值 |
| Math.random() | 返回 0 到 1 之间的随机数不包含 1 |
| Math.pow(x,y) | 返回 x 的 y 次方 |
Runtime 是一个单例,指 Java 所在的运行环境(系统内部使用)
| API | 描述 |
|---|---|
| Runtime.getRuntime() | 获取 Runtime 实例 |
| Runtime.availableProcessors() | 获取当前运行环境可用的 CPU 数 |
| Runtime.freeMemory() | 获取当前运行环境可用内存 |
| Runtime.totalMemory() | 获取当前运行环境总内存 |
| Runtime.maxMemory() | 获取当前运行环境最大内存 |
| Runtime.gc() | 运行垃圾回收器 |
| Runtime.exec(command) | 运行命令 |
| Runtime.exit(status) | 终止当前运行的进程 非 0 状态码表示异常终止 |
System 指当前系统环境(一般对外使用)
| API | 描述 |
|---|---|
| System.getProperty(key) | 获取系统属性 |
| System.out.println(x) | 输出 x |
| System.currentTimeMillis() | 获取当前系统时间戳 |
BigDecimal 是 Java 语言中用于解决浮点数运算精度丢失的问题的类。
// 1. 正确的初始化方式:使用 String,避免精度丢失
BigDecimal num1 = new BigDecimal("10.5");
BigDecimal num2 = new BigDecimal("3.2");

BigDecimal sum = num1.add(num2); // 10.5 + 3.2 = 13.7
BigDecimal difference = num1.subtract(num2); //  10.5 - 3.2 = 7.3
BigDecimal product = num1.multiply(num2);  // 10.5 * 3.2 = 33.60 精度(scale)变成 2 位时自动计算的结果

BigDecimal num3 = new BigDecimal("10");
BigDecimal num4 = new BigDecimal("3");

// 场景 A:❌ 10 / 3? 不行,这会报错,因为除不尽  必须指定 精度(小数位数) 和 舍入模式(RoundingMode)
//  BigDecimal divideExact = num3.divide(num4);
// 场景 B:除不尽,指定保留2位小数,四舍五入
BigDecimal divide1 = num3.divide(num4, 2, RoundingMode.HALF_UP);  // 10 / 3 = 3.33
// 场景 C:除不尽,指定保留4位小数,直接截断(不四舍五入)
BigDecimal divide2 = num3.divide(num4, 4, RoundingMode.DOWN); // 10 / 3 = 3.3333

// ==================== 常用工具方法:setScale(设置小数位数) ====================
BigDecimal money = new BigDecimal("123.4567");
// 保留2位小数,四舍五入(常用于金额)
BigDecimal roundedMoney = money.setScale(2, RoundingMode.HALF_UP); // 123.46

// ==================== 比较大小 ====================
BigDecimal a = new BigDecimal("2.0");
BigDecimal b = new BigDecimal("2.00");

// 比较大小必须使用 compareTo:返回 0 相等,1 大于,-1 小于
System.out.println("a.equals(b): " + a.equals(b)); // false equals 会比较数值精度
System.out.println("a.compareTo(b): " + a.compareTo(b)); // 0 (表示相等)
JDK 8 的时间类
- LocalDate:日期,如 2023-01-01。
- LocalTime:时间,如 10:30:00。
- LocalDateTime:日期和时间,如 2023-01-01 10:30:00。
- ZoneId:时区,如 UTC、Asia/Shanghai 等。
- ZoneDateTime:日期和时间和时区,如 2023-01-01 10:30:00 UTC。
- Duration:时间间隔,如 1 小时 30 分钟。
- Period:日期间隔,如 1 年 2 个月 3 天。
- Instant:时间戳,如 2023-01-01T10:30:00Z。
- DateTimeFormatter:用于格式化和解析日期和时间。(线程安全)
- SimpleDateFormat:和 DateTimeFormatter 类似,但是线程不安全,推荐使用 DateTimeFormatter。
// 1. LocalDate —— 只含日期(年-月-日)
LocalDate date = LocalDate.of(2023, 1, 1);          // 创建指定日期
System.out.println(date);                           // 2023-01-01
System.out.println(date.plusDays(10));              // 加10天 → 2023-01-11
System.out.println(date.minusMonths(2));            // 减2个月 → 2022-11-01

// 2. LocalTime —— 只含时间(时:分:秒)
LocalTime time = LocalTime.of(10, 30, 0);           // 创建指定时间
System.out.println(time);                           // 10:30:00
System.out.println(time.plusHours(1));              // 加1小时 → 11:30:00
System.out.println(time.minusMinutes(15));          // 减15分钟 → 10:15:00

// 3. LocalDateTime —— 日期 + 时间
LocalDateTime dateTime = LocalDateTime.of(2023, 1, 1, 10, 30); // 创建指定日期时间
System.out.println(dateTime);                       // 2023-01-01T10:30
System.out.println(dateTime.plusDays(5).plusHours(2)); // 加5天再+2小时 → 2023-01-06T12:30

// 4. ZoneId —— 时区标识
ZoneId zone1 = ZoneId.of("UTC");                    // 获取UTC时区
ZoneId zone2 = ZoneId.of("Asia/Shanghai");          // 获取上海时区
System.out.println(zone1);                          // UTC
System.out.println(zone2);                          // Asia/Shanghai

// 5. ZonedDateTime —— 带时区的日期时间
ZonedDateTime zdt = ZonedDateTime.of(2023, 1, 1, 10, 30, 0, 0, zone2);
System.out.println(zdt);                            // 2023-01-01T10:30+08:00[Asia/Shanghai]
System.out.println(zdt.withZoneSameInstant(zone1)); // 转换到UTC时区同一时刻 → 2023-01-01T02:30Z[UTC]

// 6. Duration —— 秒/纳秒级的时间间隔(适合时、分、秒)
LocalTime t1 = LocalTime.of(8, 0);
LocalTime t2 = LocalTime.of(9, 30);
Duration duration = Duration.between(t1, t2);       // 计算两个时间之间的间隔
System.out.println(duration);                       // PT1H30M(表示1小时30分)
System.out.println(duration.toMinutes() + " minutes"); // 转为总分钟数 → 90 minutes

// 7. Period —— 年/月/日的日期间隔(适合年、月、日)
LocalDate d1 = LocalDate.of(2023, 1, 1);
LocalDate d2 = LocalDate.of(2024, 3, 15);
Period period = Period.between(d1, d2);             // 计算两个日期之间的间隔(年/月/日)
System.out.println(period);                         // P1Y2M14D(1年2个月14天)
System.out.println(period.getYears() + " years, " + period.getMonths() + " months, " + period.getDays() + " days");
// → 1 years, 2 months, 14 days

// 8. Instant —— 时间戳(从1970-01-01T00:00:00Z开始的秒数)
Instant now = Instant.now();                        // 获取当前UTC时间戳
System.out.println(now);                            // 例如 2026-08-06T10:30:00.123Z
Instant epoch = Instant.ofEpochSecond(0);           // 从1970-01-01开始的0秒
System.out.println(epoch);                          // 1970-01-01T00:00:00Z

// 9. DateTimeFormatter —— 自定义日期时间的格式化和解析
// ofPattern 在格式化时,最好使用一个 M 一个 d 更稳妥,因为 yyyy-M-d 可以解析 2023-01-01 格式。但 yyyy-MM-dd 无法解析 2023-1-1。
DateTimeFormatter formatter = DateTimeFormatter.ofPattern("yyyy-MM-dd HH:mm:ss");
LocalDateTime dt = LocalDateTime.of(2023, 1, 1, 10, 30);
String formatted = dt.format(formatter);            // 按指定格式输出
System.out.println(formatted);                      // 2023-01-01 10:30:00
LocalDateTime parsed = LocalDateTime.parse("2023-01-01 10:30:00", formatter); // 按格式解析字符串,若字符串格式和解析格式不一致,会抛出异常
System.out.println(parsed);                         // 2023-01-01T10:30
集合
Collection
Collection 是所有集合的父接口。
-
Collection<E>父接口List<E>继承Collection<E>的接口ArrayList<E>实现类LinkedList<E>实现类,和ArrayList的区别是:LinkedList 是双链表结构,ArrayList 是数组结构。
Set<E>继承Collection<E>的接口HashSet<E>实现类LinkedHashSet<E>实现类
TreeSet<E>实现类
-
List 集合:添加的元素有索引、有序、可重复
- ArrayList、LinkedList 有索引、有序、可重复
-
Set 集合:添加的元素无索引、无序、不可重复
- HashSet 无索引、无序、不可重复
- LinkedHashSet 无索引、有序、不可重复
- TreeSet 无索引、按照大小默认升序排序、不可重复
List 和 Set 的区别就是 Set 会自动去重。
List<String> list = new ArrayList<>();
list.add("a");
list.add("b");
System.out.println(list); // [a, b, b]

Set<String> set = new HashSet<>();
set.add("a");
set.add("b");
set.add("b");
System.out.println(set); // [a, b]
Collection 常用方法:
add(E e):添加元素。相关的有addAll(Collection<? extends E> c)把目标集合中的元素添加到当前集合中。clear():清空集合。contains(Object o):判断集合中是否包含某个元素。isEmpty():判断集合是否为空。remove(Object o):删除集合中的某个元素。size():获取集合的长度。toArray():将集合转换为数组。
Collection 迭代器:
iterator():获取迭代器。鸡肋,不如直接用 for 循环。for循环,跟 js 一样。hasNext():判断是否还有下一个元素。next():获取下一个元素。forEach(Consumer<? super E> action):遍历集合。removeIf(Predicate<? super E> filter):删除符合条件的元素。removeAll(Collection<?> c):删除集合中的所有元素。
ArrayList<String> list = new ArrayList<>(List.of("Apple", "Banana", "Cherry"));

// Iterator + next // 如果需要在循环过程中 add remove 使用 list.listIterator(),不然会出现并发异常
Iterator<String> iterator = list.iterator();
System.out.println(iterator.next()); // Apple 取当前位置的数据并移位
System.out.println(iterator.next()); // Banana

// hasNext 这个示例不如直接用 for 循环
while (iterator.hasNext()) {
    System.out.print(iterator.next() + " ");
}

// for 循环
for (String s : list) {
    System.out.print(s + " ");
}

// for 循环的 Lambda 写法 正常写法 list.forEach(item->{ System.out.println(item); });
// 最简写法:方法引用写法 跟 js 的函数简写思路差不多 onChange={setValue}
list.forEach(System.out::println);
// 完整写法:匿名内部类 这个建议看一下 forEach 源码,本质就是方法回调。
// 传入 action 然后回调 action.accept(item)
list.forEach(new Consumer<String>() {
    @Override
    public void accept(String s) {
        System.out.println(s);
    }
  });
数据结构
数组和链表的区别
- 由于数组存储索引,所以查询是很快的,但是插入和删除效率低,因为这两个操作会造成数组中元素的大批量的索引所记录的数据的移动。
- 链表存储指针,所以查询效率低,但是插入和删除效率相较于数组高,因为只会修改临近的元素指针,不会造成大量元素移动。
栈/队列
- 栈:先进后出
- 队列:先进先出
链表
每个链表包含两部分,数据域和指针域。数据域存放数据,指针域存放下一个节点的指针。
- 单向链表
每个节点的指针指向下一个节点的地址。在查找时,只能从头开始查找。
比如找元素 D,则从头开始,头存储指向 A 指针地址,找到 A 指向下一个节点 B 的指针地址,B 再找到 C 的地址,一次类推找到 D。
- 双向链表
每个节点有两个指针,一个指向前一个节点,一个指向下一个节点。
在查找时,通过判断当前节点是距离头部还是距离尾部更近,从而选择从哪开始查找。
泛型类
JDK5 引入的泛型,跟 TS 的泛型差不多,不过由于 js 的灵活性,ts 泛型的可操作性比 Java 要更高。
常用的泛型命名:E 表示 element 元素,T 表示 type 类型,K 表示 key 键,V 表示 value 值。
泛型类
- 非静态方法泛型:跟着类的泛型匹配,而类的泛型,是在创建对象时就确定下来的
- 静态方法泛型:跟着方法泛型匹配,而方法泛型,是在调用方法时才确定下来
// ====== 非静态泛型 ======
class Pair<K, V> {
  private K key;
  private V value;

  public Pair(K key, V value) {
    this.key = key;
    this.value = value;
  }
}

// 创建时就确定了方法的泛型
// 如果声明了泛型但是没传入,那么 K 和 V 都会变成 Object
Pair<String, Integer> pair = new Pair<>("Apple", 1);

System.out.println(pair.getKey());
System.out.println(pair.getValue());
System.out.println(pair);

// ====== 静态泛型 ======
class Pair {
  // 静态方法泛型
  public static<T> printArray(T[] arr) {
    for (T t : arr) {
      System.out.println(t);
    }
  }
}
泛型接口
跟泛型类差不多,类实现有泛型的 interface 时,有两种操作方式:
- 类实现接口时直接确定泛型
- 报纸接口泛型,在类创建对象(new)时再确定。
// 方法一:常规 interface 泛型
interface Inter<T> {
  boolean compare(T a, T b);
}

class Apple implements Inter<Integer> {
  @Override
  public boolean compare(Integer a, Integer b) {
    return false;
  }
}

// 方法二:实现类 泛型
class Apple<T> implements Inter<T> {
  @Override
  public boolean compare(T a, T b) {
    return false;
  }
}

Apple<Integer> apple = new Apple<>();// 此时 compare 方法的泛型 T 被指定为 Integer
Apple<String> apple = new Apple<>(); // 此时 compare 方法的泛型 T 被指定为 String
泛型通配符
当泛型类型不知道,或者传入的类型比较多,无法确定具体类型时,可以使用通配符,? 表示任意类型,在实际使用中,如果不想让任意类型传入,可以使用 extends 或 super 来约束传入的类型。
? extends T表示传入的类必须是 T 或者 T 的子类? super T表示传入的类必须是 T 或者 T 的父类
interface Employee {
 void work();
}

class Leader implements Employee {
  @Override
  public void work() {
    System.out.println("Leader is working");
  }
}
class Manager implements Employee {
  @Override
  public void work() {
    System.out.println("Manager is working");
  }
}
class Coder implements Employee {
  @Override
  public void work() {
    System.out.println("Coder is working");
  }
}

ArrayList<Coder> coders = new ArrayList<>();
coders.add(new Coder());
ArrayList<Manager> managers = new ArrayList<>();
managers.add(new Manager());
ArrayList<Leader> leaders = new ArrayList<>();
leaders.add(new Leader());

method(coders);
method(managers);
method(leaders);

// 1. 这是第一种封装泛型的方法
public static<T> void method(ArrayList<T> arrayList){
  arrayList.forEach(Employee::work);
}

// 2. 还可以使用通配符,用 ? 表示任意类型,如果不想类型太广泛,可以使用 extends 或 super 进行约束
// ? extends Employee 表示传入的类型必须是 Employee 或是继承 Employee 子类
public static void method(ArrayList<? extends Employee> arrayList){
  arrayList.forEach(Employee::work);
}
Set
存储无序,没有索引(没有提供索引相关的 API),数据不重复。
- TreeSet 有排序规则
- HashSet 保证元素唯一性
- LinkedHashSet 保证元素唯一性,并且按照插入顺序排序
TreeSet<String> treeSet = new TreeSet<>();
treeSet.add("c");
treeSet.add("a");
treeSet.add("b");
treeSet.add("q");
treeSet.add("a");
System.out.println(treeSet); // [a, b, c, q]

HashSet<String> hashSet = new HashSet<>();
hashSet.add("c");
hashSet.add("a");
hashSet.add("b");
hashSet.add("q");
treeSet.add("a");
System.out.println(hashSet); // [a, q, b, c] 注意和 TreeSet 的打印不一样

LinkedHashSet<String> linkedHashSet = new LinkedHashSet<>();
linkedHashSet.add("c");
linkedHashSet.add("a");
linkedHashSet.add("b");
linkedHashSet.add("q");
linkedHashSet.add("a");
System.out.println(linkedHashSet); // [c, a, b, q] 按插入顺序排序
TreeSet 底层结构
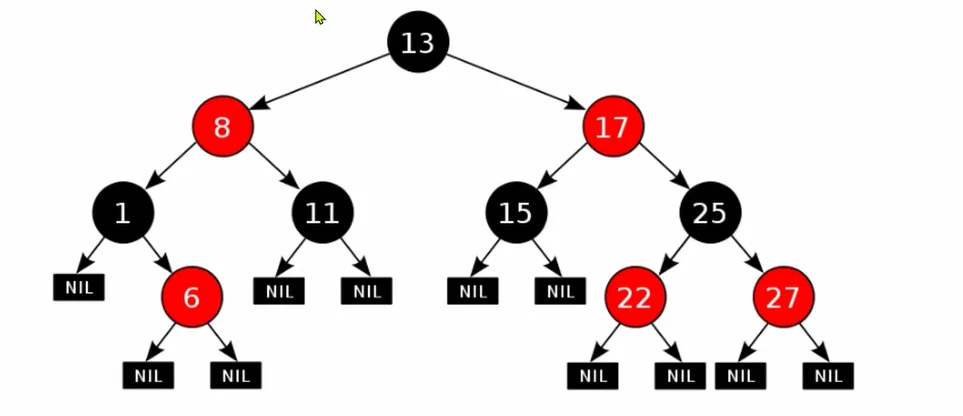
TreeSet 底层结构是红黑树,红黑树是一种自平衡的二叉查找树,是增删改查性能相对比都较好的数据结构。
- 任意节点,左边的节点都比当前节点小,右边的节点都比当前节点大
- 每次添加节点,都从根节点开始,如果比根节点小,则向左子树添加。如果比根节点大,则向右子树添加。一样的不存
TreeSet 排序方式
TreeSet 默认排序规则是自然排序,也可以指定比较器排序。
- 自然排序
TreeSet 在添加对象时,对象必须实现 Comparable 接口,并重写 compareTo 方法,否则会报错,因为对象本身不具有比较性。
重写 compareTo 方法时,return 的值:负数去左边,正数去右边,0 忽略
// × 使用 TreeSet 时报错
class Student {
//...
}

// √ 实现 Comparable 接口
class Student implements Comparable<Student> {
  // ...
  @Override
  public int compareTo(Student o) {
    return this.age - o.age; // 年龄升序
  }
}

TreeSet<Student> treeSet = new TreeSet<>();
treeSet.add(new Student("张三", 20));
treeSet.add(new Student("李四", 22));
treeSet.add(new Student("王五", 18));
treeSet.add(new Student("赵六", 22));
// [Student{name='王五', age=18}, Student{name='张三', age=20}, Student{name='李四', age=22}]
// “赵六” 的数据并没有被添加,因为 “赵六” 的年龄和 李四 的年龄相同,所以不存。
System.out.println(treeSet);
以上会出现一个问题,虽然通过 compareTo 方法指定了以 age 为排序规则防止了报错,但是也出现了一个问题:
不同的人,同样的年龄就无法添加,这是不合理的,因此需要将 name 也参与进排序规则中。
class Student implements Comparable<Student> {
  // ...
  @Override
  public int compareTo(Student o) {
    // 需求:age 作为主要排序,name次要排序,当 age 和 name 相同时,不删除数据,保留
    const ageResult = this.age - o.age;
    // 如果 age 相等,则比较 name
    const nameResult = ageResult == 0 ? this.name.compareTo(o.name): ageResult;
    // 如果 name 仍然相等,则返回 1 或者任意非 0 数据,表示不删除数据,保留
    return nameResult == 0 ? 1: nameResult;
  }
}- 比较器排序:如果同时具有自然排序、比较器排序,则比较器排序优先级高
比如以下情况,默认情况下,TreeSet 对 Integer 类型的数据进行排序时,会使用 Integer 内部 compareTo 自然排序方式进行排序,只能是是升序(从小到大),无法让 Integer 再添加的时候降序排序。
TreeSet<Integer> treeSet = new TreeSet<>();
treeSet.add(1);
treeSet.add(2);
treeSet.add(3);
treeSet.add(4);
System.out.println(treeSet); // [1, 2, 3, 4]
TreeSet 可以接收 Comparator 对象作为构造参数,用于自定义排序规则。
// 简化的 Lambda 表达式写法
// TreeSet<Integer> treeSet = new TreeSet<>((o1, o2) -> o2 - o1);
TreeSet<Integer> treeSet = new TreeSet<>(new Comparator<Integer>() {
    @Override
    public int compare(Integer o1, Integer o2) {
        return o2 - o1;
    }
});

treeSet.add(1);
treeSet.add(2);
treeSet.add(3);
treeSet.add(4);
System.out.println(treeSet); // [4, 3, 2, 1]
HashSet(使用最多)
- HashSet 底层结构是哈希表,是增删改查性能相对比都较好的数据结构。
- JDK 8 之前是数组 + 链表,JDK 8 之后是数组 + 链表 + 红黑树
HashSet 比较对象时,要保证两个对象数据唯一,必须同时重写 equals 和 hashCode 方法
class Student {
  //...
  // IDEA 中 Alt + Insert 快捷键生成
  @Override
  public boolean equals(Object o) {
      if (o == null || getClass() != o.getClass()) return false;
      Student student = (Student) o;
      return Objects.equals(name, student.name) && Objects.equals(age, student.age);
  }

  @Override
  public int hashCode() {
      return Objects.hash(name, age);
  }
}

HashSet<Student> hashSet = new HashSet<>();

hashSet.add(new Student("张三", 20));
hashSet.add(new Student("李四", 22));
hashSet.add(new Student("王五", 18));
hashSet.add(new Student("王五", 18));

// 最后一条数据被去重了
System.out.println(hashSet); // [Student{name='张三', age=20}, Student{name='王五', age=18}, Student{name='李四', age=22}]
HashSet 原理:
- HashSet 底层一部分是数组,可以类比成电影院的座位号
- 张三进入,
hashCode默认返回的是 C++ 的随机地址值(随机座位) ,张三随便坐,李四进来也随机座位,随便坐。以此类推,进来的人永远不会重复,也就没有机会调用equals来对比是不是一个人重复进入。 - 重写
hashCode,Objects.hash可以根据内容生成 hash,类似 md5。这样,当李四重复进入时,hash 值相同(人一样,座位一样),此时就需要调用equals进行对比(看是不是一个人)。 - 如果
equals返回 true,则说明是同一个人,同一个人同一个座位号,那就是他自己,此时 HashSet 就不会再添加这个数据。
为什么当 hashCode 相同时,还需要再调用 equals 方法进行对比?因为存在 hash 碰撞
以下例子,重地 和 通话 不是相同内容,但是 hash 值却相同,因此需要 equals 来做二次对比。
System.out.println("你好".hashCode()); // 652829
System.out.println("重地".hashCode()); // 1179395
System.out.println("通话".hashCode()); // 1179395
LinkedHashSet
唯一一个可以保证存取顺序的集合,内部使用链表结构。同样的,再对比对象时想要去重,和 HashSet 一样,必须同时重写 equals 和 hashCode 方法
- LinkedHashSet 依然基于哈希表(数组+链表+红黑树)
- 但是它的每一个节点除了存储数据外,还存储了前一个节点和后一个节点的引用位置,这样才保证了插入的顺序
Collections 工具类
可变参数(js args)
类似 js 的 arguments 写法:sums(...args),args 本质是一个类数组。
sums(1);
sums(1, 2);
sums(1, 2, 3);
sums(1, 2, 3, 4);

public static int sums(int... nums) {
    int total = 0;
    for (int num : nums) {
        total += num;
    }
    return total;
}
常用工具类
求最大、最小值,需要对象实现 Comparable 接口,否则无法比较,报错。
ArrayList<Integer> list = new ArrayList<>();
// 批量添加
Collections.addAll(list, 3, 1, 6, 9, 5, 7);
System.out.println(list); // [3, 1, 6, 9, 5, 7]

// 洗牌
Collections.shuffle(list);
System.out.println(list); // [5, 1, 6, 7, 3, 9]

// 最值,对象需要实现 Comparable 接口
System.out.println(Collections.max(list)); // 9
System.out.println(Collections.min(list)); // 1

// 排序(默认自然排序)
Collections.sort(list);
System.out.println(list); // [1, 3, 5, 6, 7, 9]
// 自定义排序规则(降序)
Collections.sort(list, (o1, o2) -> o2 - o1);
System.out.println(list); // [9, 7, 6, 5, 3, 1]
Map
key value 键值对,key 不允许重复
- TreeMap key 自动排序 (红黑树)
- HashMap key 无序,唯一,无索引(哈希表)
- LinkedHashMap key 插入有序,唯一,无索引(哈希表 + 双向链表)
HashMap<String, String> hashMap = new HashMap<>();
hashMap.put("1", "张三");
hashMap.put("2", "李四");
hashMap.put("3", "王五");
System.out.println(hashMap); // {1=张三, 2=李四, 3=王五}
hashMap.size(); // 3
hashMap.get("1"); // 张三
hashMap.containsKey("1"); // true
hashMap.containsValue("张三"); // true
hashMap.clear();
hashMap.isEmpty(); // true
Map 常用遍历方式
// Plan 1
Set<String> keySet = hashMap.keySet(); // [1, 2, 3]
for (String key : keySet) {
    hashMap.get(key);
}

// Plan 2
Set<Map.Entry<Integer, String>> entrySet = hashMap.entrySet(); // [1=张三, 2=李四, 3=王五]
for (Map.Entry<Integer, String> entry : entrySet) {
    System.out.println(entry.getKey() + ":" + entry.getValue()); // key:value
}

// Plan 3
hashMap.forEach((key, value) -> {
    System.out.println(key + ":" + value);
});
TreeMap LinkedHashMap 简单使用
- TreeMap 的 key 是有一定排序规则的,如果 key 是字符串,就会转成对应的的 ACSII 码进行排序
- LinkedHashMap 的 key 按插入顺序排序
TreeMap<Integer, String> treeMap = new TreeMap<>();
treeMap.put(2, "张三");
treeMap.put(1, "李四");
treeMap.put(3, "王五");
System.out.println(treeMap); // {1=张三, 2=李四, 3=王五}

LinkedHashMap<Integer, String> linkedHashMap = new LinkedHashMap<>();
linkedHashMap.put(2, "张三");
linkedHashMap.put(1, "李四");
linkedHashMap.put(3, "王五");
System.out.println(linkedHashMap); // 输出:{2=张三, 1=李四, 3=王五}
Stream
常用写法
基本用法跟 js 基本差不多,不过比 js 要再多一些使用方式。生成的 Stream 流不会影响源数据
- 集合获取 Stream
- ArrayList、Set 是最终都是基于 Collection 接口,可以直接调用
stream() - Map 无法直接调用
stream(),可以调用keySet获取 Set 集合的键集合,或者values()的 Collection 集合,然后调用stream()。但是,通常不推荐这两种,推荐使用entrySet()的 Set 集合
- ArrayList、Set 是最终都是基于 Collection 接口,可以直接调用
- 数组获取 Stream
- 可以通过
Arrays.stream(T[])转成 Stream - int[] 的 Stream 是
IntStream,而 String[] 的 Stream 是Stream<String>,用法完全一样,只是表示不一样
- 可以通过
- 零散数据获取 Stream
- 通过
Stream.of(T...)将不在任何集合中的数据转换成 Stream
- 通过
ArrayList<String> list = new ArrayList<>();
Collections.addAll(list, "张三", "李四", "张三三", "张三三三");
list.stream()
        .filter(item -> item.startsWith("张"))
        .map(item -> item + "A")
        .forEach(System.out::println); // 张三A 张三三A 张三三三A

// Set 和 ArrayList 用法一样

// Map
HashMap<String, Integer> map = new HashMap<>();
map.entrySet().stream()
        .filter(item -> item.getValue() == 1)
        .map(item -> item.getValue() + 1)
        .forEach(System.out::println);

// 数组
int[] numbers = {1,2,3,4,5};
String[] strings = {"A","B","C","D","E"};
// IntStream 和 Stream 都 extends 了 BaseStream,是兄弟关系
IntStream intStream = Arrays.stream(numbers);
Stream<String> stringStream = Arrays.stream(strings);
intStream.forEach(System.out::println);
stringStream.forEach(System.out::println);

// 零散数据
Stream<Integer> integerStream = Stream.of(1, 2, 3, 4, 5);
Stream<String> stringStream = Stream.of("A", "B", "C", "D", "E");
其他 API
filter(Predicate<? super T> predicate):过滤,用法同 jsmap(Function<? super T, ? extends R> mapper):映射,用法同 jsskip(long n)跳过 n 个元素,返回一个跳过 n 个元素后的 Streamlimit(long n)返回一个不超过 n 个元素的 Streamconcat(Stream a, Stream b)合并两个 Streamsorted()排序,默认升序distinct()去除重复元素
collect 收集(转换为可操作数据)
Stream 流本身无法返回正常数据,返回的都是 Stream 流,可以基于 Collectors 工具类来将 Stream 流转换为正常数据,其中 toList 方法可以直接通过 Stream 流转换为 List
// toList
Stream<Integer> integerStream = Stream.of(1, 2, 3, 4, 5);
List<Integer> list = integerStream.collect(Collectors.toList()); // 省略写法 integerStream.toList()

// toSet
Stream<String> stringStream = Stream.of("A", "B", "C", "D", "E");
Set<String> set = stringStream.collect(Collectors.toSet());

// toMap
ArrayList<String> stringArrayList = new ArrayList<>();
Collections.addAll(stringArrayList, "张三,18", "李四,20", "王五,21");
// toMap(keyMapper, valueMapper)
// keyMapper 的函数接口,第一个泛型是原数据类型,第二个泛型是转成 Map 的 key 类型,重写方法返回处理后的 key
// valueMapper 的函数接口,第一个泛型是原数据类型,第二个是转成 Map 的 value 类型,,重写方法返回处理后的 value
Map<String, Integer> map = stringArrayList.stream().collect(Collectors.toMap(new Function<String, String>() {
    @Override
    public String apply(String s) {
        return s.split(",")[0];
    }
}, new Function<String, Integer>() {
    @Override
    public Integer apply(String s) {
        return Integer.valueOf(s.split(",")[1]);
    }
}));
System.out.println(map); // {李四=20, 张三=18, 王五=21}

// toMap Lambda 写法
Map<String, Integer> map = stringArrayList.stream().collect(Collectors.toMap(
        s -> s.split(",")[0], // key
        s -> Integer.valueOf(s.split(",")[1] // value
        )));
异常
大部分异常都是运行时异常 RuntimeException,编译时不会检查,运行时检查
int[] arr = {1, 2, 3}
System.out.println(arr[4]); // java.lang.ArrayIndexOutOfBoundsException 数组索引越界
System.out.println(1 / 0); // java.lang.ArithmeticException 数学运算异常
String str = null;
System.out.println(str.length()); // java.lang.NullPointerException 空指针异常
Object obj = "你好"
Integer integer = (Integer) obj; // java.lang.ClassCastException 类型转换异常
System.out.println(Integer.valueOf("12a")); // NumberFormatException 数字格式化异常
主动抛出异常、捕获异常
private static void throwException() {
  throw new RuntimeException("主动抛出异常");
}

try {
    System.out.println(Integer.valueOf("12a"));
} catch (RuntimeException e) {
    e.printStackTrace(); // 输出异常信息 通常情况下这里会使用 Logger
}
自定义异常
自定义异常继承 Exception 或者 RuntimeException
继承 RuntimeException 的异常是运行时异常,可以主动抛出错误
public class ServiceRuntimeException extends RuntimeException {
    public ServiceRuntimeException() {
    }

    public ServiceRuntimeException(String message) {
        super(message);
    }
}

public static void test() {
  throw new ServiceRuntimeException("自定义异常");
}
继承 Exception 的异常是编译时异常,手动 throw 抛出时,必须也在调用方的方法上 throw 抛出
带有编译时异常的方法,在调用时必须主动 try catch 或继续在调用的方法上 throw 抛出错误,编译时异常通常不推荐使用
// 和 RuntimeException 的写法完全一样,仅仅改变继承的类
public static void test() throws ServiceException { // throws ServiceException
  throw new ServiceRuntimeException("自定义异常");
}

public static void main(String[] args) {
  try {
    test(); // 必须在 try catch 中处理或继续在方法上 throw 抛出
  }catch (ServiceException e) {
    e.printStackTrace();
  }
}
时间类 API 补充
Math System BigDecimal 和时间类查看 Math System Runtime BigDecimal 章节
修改年月日时分秒相关的方法,LocalDateTime LocalDate LocalTime 都是不可变的,返回一个新的对象,不会改变原对象
withYear()withMonth()withDayOfMonth()年月日修改withHour()withMinute()withSecond()withNano()时分秒(纳秒)修改
LocalDateTime dt = LocalDateTime.of(2026, 1, 31, 10, 30); // 2026-01-31T10:30

// 修改年份为 2025 年
System.out.println(dt.withYear(2025)); // 2025-01-31T10:30

// 修改月份为 2月,但是 2 月没有31 天,所以天会自动到当月的最后一天
System.out.println(dt.withMonth(2)); // 2026-02-28T10:30

// withDayOfMonth(31):如果当前是2月,直接设置日为31号,会直接抛异常
// 但如果当前是1月,设置日为31号,则正常
System.out.println(dt.withDayOfMonth(15)); // 输出:2026-01-15T10:30plusYears()plusMonths()plusWeeks()plusDays()将时间按年、月、周、日增加plusHours()plusMinutes()plusSeconds()plusNanos()将时间按小时、分、秒、纳秒增加minusYears()minusMonths()minusWeeks()minusDays()将时间按年、月、周、日减少`minusHours()minusMinutes()minusSeconds()minusNanos()将时间按小时、分、秒、纳秒减少
LocalDateTime now = LocalDateTime.now();
System.out.println(now); // 2026-08-30T16:36:37.072493500
System.out.println(now.plusYears(1)); // 2027-08-30T16:36:37.072493500
System.out.println(now.plusMonths(1)); // 2026-09-30T16:36:37.072493500
System.out.println(now.plusWeeks(1)); // 2026-09-06T16:36:37.072493500
System.out.println(now.plusDays(1)); // 2026-08-31T16:36:37.072493500
// 剩下的略isBefore()isAfter()判断时间是否早于、晚于某个时间
LocalDateTime now = LocalDateTime.now(); // 2026-08-30T16:36:37.072493500
// 当前时间是否在 2026-01-01 00:00:00 之前 false
System.out.println(now.isBefore(LocalDateTime.of(2026, 1, 1, 0, 0)));
// 当前时间是否在 2026-01-01 00:00:00 之后 true
System.out.println(now.isAfter(LocalDateTime.of(2026, 1, 1, 0, 0)));Duration类用于计算两个时间之间的间隔(秒、纳秒)Period类用于计算两个日期之间的间隔(年、月、日)ChronoUnit结合以上两个的所有功能
ChronoUnit.XXX.between(start, end) 就是两个时间的间隔,后者减前者。XXX是 ChronoUnit 提供的一些静态常量,比如 YEARS MONTHS DAYS HOURS MINUTES SECONDS MILLIS 等等。
File/IO 等
File
- File 创建文件,如果路径是相对路径,那就会在当前运行项目的根目录下查找或创建
- File(String pathname)
- File(String parent, String child)
- File(File parent, String child)
File file = new File("E:\\A.txt"); // 文件路径和文件夹路径都支持
File file1 = new File("E:\\", "A.txt");
File file2 = new File(new File("E\\"), "A.txt");

System.out.println(file.exists()); // 是否存在

// 创建文件,相对路径,在当前项目根目录创建
File file3 = new File("A.txt");
try {
    boolean newFile = file3.createNewFile();
    System.out.println(newFile); // true
    System.out.println(file3.getAbsoluteFile()); // F:\myself\java-learn\java-01\java-01\A.txt
} catch (IOException e) {
    throw new RuntimeException(e);
}- File 常用 API
isDirectory()判断是否是目录(文件夹)isFile()判断是否是文件exists()判断文件是否存在length()获取文件大小getName()获取文件名(带后缀)getAbsoluteFile()获取绝对路径listFiles()获取文件列表,会把当前目录下所有的文件和文件夹返回成一个 File 数组mkdir()创建目录(文件夹)mkdirs()创建多级目录(文件夹)delete()删除文件或文件夹,delete 只能删除空的文件夹,如果文件夹有内容,则删除失败返回 falserenameTo()重命名文件
IO
IO 就是 I(Input) 和 O(Output),输入(读取)和输出(写入)。IO 流可以分为 字节流 和 字符流。字节流又称万能流,因为任何文件都是由字节组成。字符流是为了解决字节流读取纯文本文件的中文可能出现乱码的问题。
流对象用完之后要记得调用 close 关闭流,不然会始终占用资源(内存泄漏)
字节流:
- 抽象类有
InputStream(字节输入流)OutputStream(字节输出流),不能直接创建对象 - 对应的抽象子类有
FileInputStreamFileOutputStream
字符流:
- 抽象类有
Reader(字符输入流)Writer(字符输出流),不能直接创建对象 - 对应的抽象子类有
FileReaderFileWriter
字节流写入数据 FileOutputStream
public static void main(String[] args) throws IOException {
  // 如果文件不存在,会自动创建,存在,默认写入时会先清空文件内容,再写入
  // 第二个参数是 append 追加,设为 true 就是向现有内容追加而非覆盖
  FileOutputStream fos = new FileOutputStream("A.txt", true);

  fos.write(97);
  fos.write(98);
  fos.write(99); // 运行完 A.txt 中是 abc

  byte[] bytes = {97, 98, 99};
  fos.write(bytes); // 运行完 A.txt 中是 abcabc

  // 起始索引为 0 的位置开始,写入 2 长度的字节,即 {97,98}
  fos.write(bytes, 0, 2); // 运行完 A.txt 中是 abcabcab

  // 写入中文
  fos.write("你好".getBytes());
}
注意:以上写法中,不管任何异常都直接抛出 IO 异常并不是规范写法
IO 流标准异常处理
JDK7 之前写法(了解即可)
FileOutputStream fos = null;
// 为什么 close 需要写在 finally 中?
// 如果 close 之前有异常导致程序终止,那这个流就永远无法关闭
try {
    fos = new FileOutputStream("A.txt", true);
    fos.write("你好".getBytes());
} catch (IOException e) {
    e.printStackTrace();
} finally {
    if (fos != null) {
        try {
            fos.close();
        } catch (IOException e) {
            e.printStackTrace();
        }
    }
}
JDK7 新写法(推荐),会自动调用 close() 关闭流,try 的内部只有实现过 AutoCloseable 接口的类才能这么写
try (FileOutputStream fos = new FileOutputStream("A.txt", true)) {
  fos.write("你好".getBytes());
}catch (IOException e) {
  e.printStackTrace();
}
字节流读取数据 FileInputStream
read()读取一个字节,返回一个 int,如果已经读完,返回 -1read(byte[] b)读取字节数组,返回读取的有效字节数,如果已经读完,返回 -1
read 不传递就是默认一次读一个字节。传入 byte[] 数组 n,一次读取 n 个字节,返回值不再是读取到的字节,而是读取了几个字节。
// 文件内容为 abcde
FileInputStream fis = new FileInputStream("A.txt");

int b;
while ((b = fis.read()) != -1) {
    System.out.println(b); //  97 98 99 ... 依次打印
}
fis.close();

FileInputStream fis = new FileInputStream("A.txt");
int b;
byte[] size = new byte[3];
while ((b = fis.read(size)) != -1) {
    System.out.println(b); //  3 2 依次打印读取到的字节长度
    System.out.println(Arrays.toString(size));// [97, 98, 99] [100, 101, 99] 依次打印
}
fis.close();
以上代码可以发现,在传入 byte[] 数组时,虽然读取分别返回了 3 个和 2 个字节,但是读取 2 字节返回的结果依然是 3 个字节数组,第 3 个字节位置的数据其实是上一轮读取的残留数据。
解决这个问题可以使用 String(byte[] bytes, int offset, int length),len 传入当前读取到的有效字节可以防止将残留数据进行读取。
// 文件内容为 abcde
FileInputStream fis = new FileInputStream("A.txt");
byte[] b = new byte[3];
int len;
while ((len = fis.read(b)) != -1) {
    String s = new String(b, 0, len); // 将字节转换成对应的字符串
    System.out.println(s); // abc de 依次打印
}
fis.close();
字符流
用于读取纯文本文件时,中文乱码的问题。基本就是把 FileInputStream 换成 FileReader,byte 数组换成了 char 数组。
// 文件内容为 abcde
FileReader fr = new FileReader("A.txt");
char[] c = new char[3];
int len;
while ((len = fr.read(c)) != -1) {
    String s = new String(c, 0, len);
    System.out.print(s + "-"); // 你好,-你好-
}
fr.close();
FileWriter 提供了 flush() 用于刷新缓冲区,将数据写入文件。
默认情况下 FileWriter 的 Writer 父类中 有一个 writeBuffer 缓冲区,只有当写入的数据达到 1024 个字节时,才会将缓冲区的数据写入文件。在不关闭流的情况下,如果想马上写入文件,可以使用 flush() 方法。
flush()刷新缓冲区,将数据写入文件,刷新之后相当于清空缓冲区,依然可以继续写入数据close()关闭流,将缓冲区中的数据写入文件,并清空缓冲区,不可以再写入数据
// 文件内容为 abcde
FileWriter fw = new FileWriter("A.txt");

char[] chs = {'a', 'b', 'c'};

fw.write(chs);
fw.write("你好菜啊");
fw.write(chs, 0, 2);
fw.write("张三");
fw.write("不要断章取义", 2, 4);
// 最后 A.txt 输出 abc你好菜啊ab张三断章取义
fw.close();
Properties
Properties 跟 Map 比较像,常用于配置文件的读取。
基础方法使用
setProperty(String key, String value)类似 Map 的 put,虽然其本身也有 put 方法,但是不建议使用getProperty(String key)stringPropertyNames()类似 Map 的keySet
Properties properties = new Properties();
properties.setProperty("username", "admin");
properties.setProperty("password", "123456");

System.out.println(properties); // {password=123456, username=admin}
System.out.println(properties.getProperty("username")); // admin
System.out.println(properties.stringPropertyNames()); // [password, username]
// Properties properties = new Properties();
// properties.load(new FileInputStream("db.properties"));
// System.out.println(properties.getProperty("url"));
与 IO 文件流相关的方法
load(InputStream inStream)读将文件中的数据加载到 Properties 中store(OutputStream out, String comments)将 Properties 中的数据写入到文件中
loading 方法
Properties properties = new Properties();
// 加载文件
FileInputStream fis = new FileInputStream("src\\main\\resources\\config.properties");
properties.load(fis);
System.out.println(properties); // {password=123456, username=admin}
fis.close();
store 方法
Properties properties = new Properties();
properties.setProperty("username", "admin");
properties.setProperty("password", "123456");

FileOutputStream fos = new FileOutputStream("src\\main\\resources\\config.properties");
properties.store(fos, "哦耶"); // comment 可以传 null,尽量不要传递中文,因为写入时会始终转换成 Unicode
fos.close();

// 最终写入的文件内容
#\u54E6\u8036
#Tue Sep 01 22:59:47 CST 2026
password=123456
username=admin
线程
一个进程可以同时执行多个任务,每个任务都是一个线程。单线程只能调用一个 CPU,这种对于多核 CPU 来说其实是一种性能浪费。可以将一个线程中的多个任务分配多个 CPU 进行运算,从而提高效率。
但是有个错觉,当运行任务多于系统线程时,下意识以为线程会在第一批任务处理完成之后再去执行第二批,其实是线程在大量运行任务之间进行快速切换。
Thread 线程基础认识
当 Java 程序运行时,至少包含两个线程:main 主线程 和 GC 垃圾回收线程。
- 编写 class 类继承 Thread 类
- 重写 run 方法
- 将线程代码写入 run 方法
- 创建线程对象
- 调用 start 方法启动线程(同时会调用 run 方法)
class DemoThread extends Thread {
    @Override
    public void run() {
        for (int i = 0; i < 500; i++) {
            System.out.println("run方法执行" + i);
        }
    }
}

DemoThread demoThread = new DemoThread();
demoThread.start();

for (int i = 0; i < 500; i++) {
    System.out.println("主线程执行" + i);
}
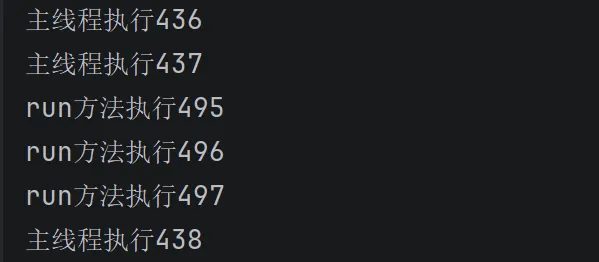
最终执行时,主线程的 for 循环和 DemoThread 的 for 循环交替执行。
创建线程的三种方式
- 继承 Thread 类
- 实现 Runnable 接口
- 相比 Thread 的优势,Thread 只能被继承使用,而 Java 只能单继承,这会导致原本继承过父类的类,就无法再继承 Thread 类
- 而 Runnable 是接口,可以多实现,相比 Thread 更灵活,但是用法稍微繁琐一点点
implements Runnable->new DemoThread->new Thread(demoThread)->thread.start()
- 使用 Callable 接口
- 如果想让线程有返回值,可以使用 Callable 接口
implements Callable->new DemoThread->new FutureTask(demoThread)->new Thread(task)->thread.start()- 相比 Runnable 的创建,Callable 又多了一个
new FutureTask()的步骤 - 可通过
new FutureTask()的get()方法获取线程的返回值
// Runnable
class DemoThread implements Runnable {
    @Override
    public void run() {
    // ...
    }
}
DemoThread demoThread = new DemoThread();
Thread thread = new Thread(demoThread);
thread.start();

//  Callable
class DemoThread implements Callable<Integer> {
    @Override
    public Integer call() throws Exception {
        int sum = 0;
        for (int i = 0; i < 1000; i++) {
            sum += i;
        }
        return sum;
    }
}
DemoThread demoThread = new DemoThread();
FutureTask<Integer> task = new FutureTask<>(demoThread);
Thread thread = new Thread(task);
thread.start();
Integer result = task.get();
System.out.println(result);
线程常见方法
除了以上使用的 start 和 get 方法外,还有一些
getName()获取线程名称setName()设置线程名称new Thread(xx,"线程名称")也可以currentThread()获取当前线程对象sleep()让线程休眠的时间(毫秒)
class DemoThread extends Thread {
    @Override
    public void run() {
      // Thread.currentThread().getName()
        System.out.println(super.getName());
        /**
         *
            for (int i = 0; i < 5; i++) {
              System.out.println("倒计时:" + i);
            try {
                Thread.sleep(1000); // 每间隔 1000 毫秒输出一次
            } catch (InterruptedException e) {
                throw new RuntimeException(e);
            }
        }
         */
    }
}

DemoThread demoThread1 = new DemoThread();
DemoThread demoThread2 = new DemoThread();

demoThread1.setName("线程1");

// 默认线程名称为 Thread-x 输出:Thread-1 线程1(因为并行,所以不分先后顺序)
demoThread1.start();
demoThread2.start();
线程优先级默认为 5,最小为 1,最大为 10,优先级越高的线程,越容易抢占到 CPU,越快被执行(完成),虽然依然是并行执行,但是优先级更高的越容易更早执行完毕。
getPriority()获取线程优先级setPriority()设置线程优先级setDaemon(true)设置线程为守护线程,当所有非守护线程执行完毕时,守护线程会自动结束,不管这些线程是哪里来的,这个规则是不变的。
线程安全问题/同步
案例:100 张票 3 个窗口卖票。当票卖出的时候,正常应该当前票数减 1,但是线程是不断切换的,当线程一在第 1 张票卖出准备减 1 时,线程二抢到资源开始执行,此时票数还没减 1,线程二会再次卖出第 1 张票。会造成票数重复卖出。
意思就是,有多个线程同时操作一个数据时,就会出现线程问题。
解决以上问题可以使用同步技术:
- 同步代码块 synchronized 可以让当前的方法必须执行完毕才能轮到下一个线程执行,但是相对的会降低运行效率
- 同步方法。在返回值前边添加
synchronized关键字- 同步方法也是有锁对象,只不过是内部自动指定
- 静态方法的锁对象是字节码对象,非静态方法锁对象是 this
- Lock
ReentrantLock锁。主动上锁,释放锁
同步代码块:
class TickTask implements Runnable {
    int tickNum = 1000;
    final Object lockObj = new Object();

    @Override
    public void run() {
        while (true) {
          // synchronized (锁对象) {}
          // 推荐使用 TickTask.class 传入锁对象,就是字节码对象,在程序运行中是唯一的
            synchronized (TickTask.class) {
                if (tickNum <= 0) {
                    System.out.println("票已卖完");
                    break;
                }
                System.out.println(Thread.currentThread().getName() + "卖出第" + tickNum + "张票");
                tickNum--;
            }
        }
    }
}

TickTask task = new TickTask();
Thread thread1 = new Thread(task, "窗口A");
Thread thread2 = new Thread(task, "窗口B");
Thread thread3 = new Thread(task, "窗口C");
thread1.start();
thread2.start();
thread3.start();
同步方法:
class TickTask implements Runnable {
    int tickNum = 1000;

    @Override
    public void run() {
        while (true) {
            if (outTick()) {
                System.out.println("票已卖完");
                break;
            }
        }
    }

    // synchronized 修饰符作为同步方法调用
    private synchronized boolean outTick() {
        if (tickNum <= 0) {
            return true;
        }
        System.out.println(Thread.currentThread().getName() + "卖出第" + tickNum + "张票");
        tickNum--;
        return false;
    }
}
ReentrantLock 锁:需要注意上锁了一定要释放锁,否则进程无法终止。
class TickTask implements Runnable {
    int tickNum = 1000;
    ReentrantLock lock = new ReentrantLock();

    @Override
    public void run() {
        while (true) {
            if (tickNum <= 0) {
                break;
            }

            // 或者 try finally 也可以,在 finally 中释放锁
            lock.lock(); // 上锁
            System.out.println(Thread.currentThread().getName() + "卖出第" + tickNum + "张票");
            tickNum--;
            lock.unlock(); // 释放锁
        }
    }
}
线程池
线程的创建和销毁非常消耗资源,因为涉及到和操作系统的交互,而创建大量生命周期很短的线程,会严重浪费系统资源。
将线程对象交给线程池管理,可以降低系统资源的消耗。但是 阿里规范手册中 不允许使用 JDK 自带的 Executors 创建线程池,因为 Executors 默认创建的线程数量和请求队列很大,当请求或线程数量过多时可能会造成 OOM(堆内存溢出)。
JDK 线程池
JDK 自带得线程池(了解)。newCachedThreadPool 默认允许创建 Integer.MAX_VALUE 个线程,可以使用 newFixedThreadPool 创建固定数量的线程。
// 获取线程池对象
ExecutorService threadPool = Executors.newCachedThreadPool();
// 提交线程任务到线程池
// 提交 100 个线程
for (int i = 0; i <= 100; i++) {
    threadPool.submit(new Runnable() {
        @Override
        public void run() {
            System.out.println(Thread.currentThread().getName() + "提交线程任务");
        }
    });
}
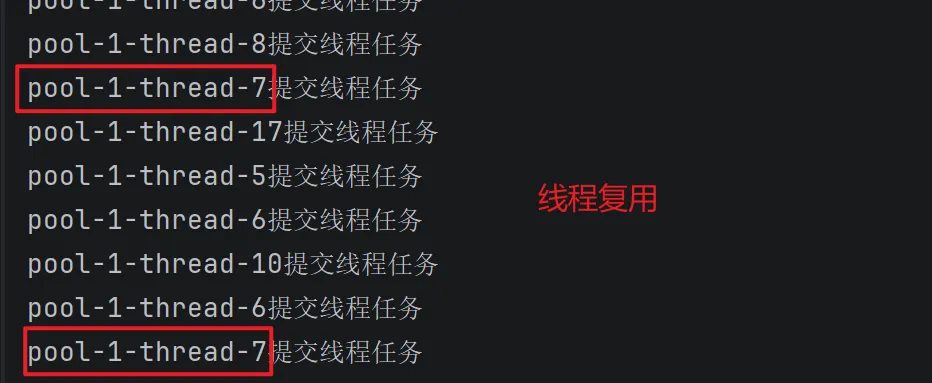
最终提交得 100 个线程,线程池会自动分配,自动复用线程。
自定义线程池
之前的 newCachedThreadPool() 的源码就是下边的,newFixedThreadPool 指定线程池数量也是使用 ThreadPoolExecutor,这个 ThreadPoolExecutor 就是可以直接进行自定义线程池的对象。
public static ExecutorService newCachedThreadPool() {
    return new ThreadPoolExecutor(0, Integer.MAX_VALUE,
                                  60L, TimeUnit.SECONDS,
                                  new SynchronousQueue<Runnable>());
}

public static ExecutorService newFixedThreadPool(int nThreads) {
    return new ThreadPoolExecutor(nThreads, nThreads,
                                  0L, TimeUnit.MILLISECONDS,
                                  new LinkedBlockingQueue<Runnable>());
}
ThreadPoolExecutor 有 7 个参数
- corePoolSize:核心线程数(餐馆正式员工)
- maximumPoolSize:最大线程数(最多有几个员工,比如
corePoolSize=3,maximumPoolSize=5,意思最多再招 2 个临时工(临时线程)) - keepAliveTime:线程空闲时间(超过这个时间临时工就需要被开除(销毁临时线程))
- unit:时间单位
- workQueue:任务队列(排队人数)
ArrayBlockingQueue有界队列(推荐使用)LinkedBlockingQueue无界队列(虽然名义无界,但是内部也指定了一个默认大小,默认为Integer.MAX_VALUE)
- threadFactory:线程工厂
- handler:拒绝策略
ThreadPoolExecutor executor = new ThreadPoolExecutor(
        2, // 2 核心线程数
        5, // 5 最大线程数
        60, // 60 线程空闲时间
        TimeUnit.MINUTES, // 分钟
        new ArrayBlockingQueue<>(10), // 排队队列(排队人数) 10
        Executors.defaultThreadFactory(), // 线程工厂
        new ThreadPoolExecutor.AbortPolicy() // 拒绝策略(超过排队人数触发拒绝策略)
);

// 12 不会出现第 3 个线程,因为 12=2+10,还不需要创建临时线程,13 才会创建第 3 个线程(临时)
// 当为 16 时,
for (int i = 1; i <= 13; i++) {
    poolExecutor.submit(new Runnable() {
        @Override
        public void run() {
            System.out.println(Thread.currentThread().getName() + "提交线程任务");
        }
    });
}- 只有当**提交的线程数量 > corePoolSize(核心线程)+ workQueue.size()(排队人数)**时,才会创建临时线程(招临时工)。
- 只有当**提交的线程数量 > maximumPoolSize(最大线程)+ workQueue.size()(排队人数)**时,才会触发拒绝策略(临时工都在忙,排队人数超了,默认策略会把最新排队的给丢掉(抛异常))
线程池的拒绝策略:
- AbortPolicy:默认策略,丢弃任务并抛异常
- DiscardPolicy:丢弃任务但不抛异常(不推荐)
- DiscardOldestPolicy:丢弃队列中等待最久的任务,把当前任务加入队列执行
- CallerRunsPolicy:调用 run 方法,绕过线程池直接执行(让主线程干活)
高级技术
枚举 enum
枚举的第一行必须是枚举对象的名称,这些名称都是常量。
public enum ColorEnum {
    RED, BLUE, PINK;
}

System.out.println(ColorEnum.BLUE); // BLUE 在正常情况下,经过序列化返回给前端就是字符串 'BLUE'
System.out.println(ColorEnum.BLUE.ordinal()); // 索引为 1
如果有一些含义比较复杂的枚举对象,无法用简单的变量名来表示,可以定义枚举对象的属性,然后通过属性获取枚举对象的值。
public enum ColorEnum {
    RED("red", "红色"),
    BLUE("blue", "蓝色"),
    PINK("pink", "粉色");

    private final String en;
    private final String zhCN;

    ColorEnum(String en, String zhCN) {
        this.en = en;
        this.zhCN = zhCN;
    }

    public String getEn() {
        return en;
    }

    public String getZhCN() {
        return zhCN;
    }
}

System.out.println(ColorEnum.BLUE.getEn() + ":" + ColorEnum.BLUE.getZhCN());
反射 Reflect
官方原话:反射就是加载类,并允许以编程的方式访问和修改它的方法、成员变量、构造器等。
在 IDEA 中,通过 new 创建的对象,在调用时 IDEA 可以提示出这个属性的各种方法和变量,这就是使用的反射实现的。
- 反射第一步:加载类,获取类的字节码(class 对象)
类名.class或Class.forName("类名")或对象.getClass()
// 这三种方式获取到的字节码地址是完全相同的,就是同一个
Class studentClass = Student.class;
System.out.println(studentClass); // class com.jsq.Student
System.out.println(Class.forName("com.jsq.Student")); // class com.jsq.Student
Student student = new Student();
System.out.println(student.getClass()); // class com.jsq.Student- 获取类的构造器:Constructor 对象。常用
getDeclaredConstructors()获取全部构造器对象,getConstructors()只能获取 public 修饰的
获取类构造器的作用:初始化对象,说白了就是 new 一个对象。有点脱裤子放屁,但是在场景下确实是有用的(因为有获取私有构造器/属性/方法的权限,因此能突破原本封装性)。
Class studentClass = Student.class;
// Constructor[] constructors = studentClass.getConstructors();

// 获取全部构造器
Constructor[] constructors = studentClass.getDeclaredConstructors();
for (Constructor constructor : constructors) {
    // i=0 com.jsq.Student==>public com.jsq.Student()
    // i=1 com.jsq.Student==>public com.jsq.Student(java.lang.String,java.lang.Integer)
    System.out.println(constructor.getName() + "==>" + constructor);
}

// 获取类的 有参/无参构造器
Class studentClass = Student.class;
Constructor c1 = studentClass.getDeclaredConstructor(); // 定位到无参构造器
Constructor c2 = studentClass.getDeclaredConstructor(String.class, Integer.class); // 定位到有参构造器

Student s1 = (Student) c1.newInstance(); // 等价于 new Student()
// 但是,如果 Student 构造器是 private 修饰,则以下代码会报错,使用 setAccessible 强制访问
// c2.setAccessible(true); // 暴力反射(禁止检查访问权限)
Student s2 = (Student) c2.newInstance("张三", 18); // 等价于 new Student("张三", 18)- 获取类的成员变量:Field 对象
Class studentClass = Student.class;

Field[] fields = studentClass.getDeclaredFields();
for (Field field : fields) {
    // class java.lang.String name
    // class java.lang.Integer age
    System.out.println(field.getType() + " " + field.getName());
}

Student student = new Student();
// 获取单个成员变量
Field nameField = studentClass.getDeclaredField("name");
// nameField.setAccessible(true); // 如果是私有成员变量,则需要强制访问
nameField.set(student, "张三"); // 给 name 成员变量赋值
String name = (String) nameField.get(student); // 获取 name 成员变量的值
System.out.println(name);- 获取类的成员方法:Method 对象
Class studentClass = Student.class;

Method[] methods = studentClass.getDeclaredMethods();
for (Method method : methods) {
    System.out.println(method.getName());
}

Student student = new Student();
// 获取单个成员方法
Method method = studentClass.getDeclaredMethod("getName");
method.setAccessible(true);
// 如果 getName 是有参数的,则 method.invoke(student, 参数1, 参数2, ...)
Object o = method.invoke(student); // 调用 getName 方法
System.out.println(o);
注解
@Override @Test 这些就是,根据注解让可以程序如何执行当前注解上的程序。
注解可以在非常多地方使用;方法、类、成员变量、构造器等等,基本都能用。
自定义注解
- 注解使用
@interface定义,由public 属性类型 属性名称() default 默认值;构成 - 如果一个注解中只有一个
value属性(必须叫 value),在使用注解时可以省略属性名
public @interface MyTest {
    String name();

    double money() default 100;

    String[] author();
}

public @interface MyTest2 {
    String value();
}

@MyTest(name = "张三", author = {"张三", "李四"})
@MyTest2("张三") // 等价于 @MyTest2(value = "张三")
注解的原理:
- 注解其实就是一个继承了
Annotation的接口 - 而注解内的属性其实就是抽象方法
元注解
修饰注解的注解就是元注解。元注解有:@Target @Retention @Documented @Inherited,常用的就是 @Target @Retention
@Target 用来指定注解的作用范围(被修饰的注解能在哪些地方使用,比如 @Target(ElementType.METHOD) 表示该注解只能用于方法上),也可以同时指定多个作用范围
ElementType.TYPE类、接口(包括注解类型)ElementType.FIELD成员变量ElementType.METHOD方法ElementType.PARAMETER方法参数ElementType.CONSTRUCTOR构造器ElementType.LOCAL_VARIABLE局部变量ElementType.ANNOTATION_TYPE注解
@Target(ElementType.METHOD) // 只能在方法上用 MyTest 注解,其他地方会报错
@Target({ElementType.METHOD, ElementType.TYPE}) // 可在方法、类上用 MyTest 注解
public @interface MyTest {
    String name();

    double money() default 100;

    String[] author();
}
@Retention 用来指定注解的生命周期(注解保留在哪些地方),也可以同时指定多个生命周期
RetentionPolicy.SOURCE仅保留在源代码中,编译后的字节码文件中RetentionPolicy.CLASS(默认值),注解保留在源代码和编译后的字节码文件中,但运行阶段不存在RetentionPolicy.RUNTIME(开发常用)一直保留到运行阶段,因为很多逻辑代码会基于注解去做,比如 AOP,不做成 RUNTIME 跟没做一样