Loading...
vue-router
安装 vue-router
npm i vue-router路由基本使用
- 创建路由实例

- 在
main.js中使用 路由实例

- 使用
<router-link>设置跳转链接。使用<router-view>设置路由组件的渲染位置

redirect 在 router 实例中的作用就是 路由重定向,访问 path 路径时,重定向到 redirect 对应的 path 路径
router-link
to:可以是字符串to = "/home",也可以是对象::to = {path:"/home",{...options} },对象属性的配置为如下几条replace:默认为 push,直接在标签中写 replace,则是进行路由替换而非新添加路由地址,不会保留历史记录active-class:设置激活 a 元素后应用的 class,默认是router-link-active,可以通过该 class 设置点击后的激活样式。exact-active-class:链接精准激活时,应用于渲染的<a>的 class,默认是router-link-exact-active
路由懒加载
// 直接导入
import Home from '@/views/Home.vue';
// 按需导入
const Home = () => import('@/views/Home.vue');

// webpack 打包的 chunk 命名,
// 默认打包的 chunk 文件是没有名字的,如果想打包后有名字方便查找,可以添加魔法注释,这种注释会被 webpack 解析
const Home = () => import(/* webpackChunkName: 'home' */ '@/views/Home.vue');
动态路由
类似 xxx/:xx ,以 /: 做匹配的路由都是动态路由
-
使用动态路由

-
获取动态路由的值
-
template 模板中获取,通过
$route.params获取参数对象
<template>
  <!-- {id: 123} -->
  <h3>User组件参数: {{ $route.params }}</h3>
</template>- 在 options API 中,通过
this.$route.params获取参数对象
<script>
  export default {
    created() {
      console.log(this.$route.params);
    },
  };
</script>- 在 setup 语法糖中,需要使用
vue-router库给提供的一个 hook:useRoute
<script setup>
  import { useRoute } from 'vue-router';

  const route = useRoute();
  console.log(route.params);
</script>
NotFound
用于路由匹配不到时显示的组件
const router = createRouter({
  history: createWebHashHistory(),
  routes: [
    /* .... */
    {
      // 任何匹配不到的路径,都会显示下面这个组件
      path: '/:pathMatch(.*)',
      component: () => import('@/views/NotFound.vue'),
    },
  ],
});

/** 访问 /abc/cba/123
 * path: "/:pathMatch(.*)",  通过 $route.params.pathMatch 得到://abc/cba/123
 * path: "/:pathMatch(.*)*", 得到的是["abc", "cba", "123"]
 */
在 NotFound 组件内部,在模板中,可以通过 $route.params.pathMatch
路由嵌套
const router = createRouter({
  history: createWebHashHistory(),
  routes: [
    {
      path: '/',
      redirect: '/home',
    },
    {
      path: '/home',
      component: () => import('@/views/Home.vue'),
      children: [
        {
          path: '',
          redirect: '/home/prod',
        },
        {
          path: 'prod',
          component: () => import('@/views/Production.vue'),
        },
        {
          path: 'dev',
          component: () => import('@/views/Development.vue'),
        },
      ],
    },
  ],
});
编程式导航
路由跳转及传参
router-link的跳转为声明式导航,要通过 js 代码实现的路由跳转为编程式导航
- 路由跳转
- Options API 跳转:
this.$router.push("/user"), 也可以传入一个对象:({path:"/user"}) - setup 语法糖跳转:
const router = useRoute(); router.replace("/user")
- Options API 跳转:
- 传递 query 参数
this.$router.push({
  path: '/user',
  query: {
    name: 'zs',
    age: 18,
  },
});
// useRouter 同理- 获取 query 参数:
$route.query - 页面的前进后退
const router = useRoute();
// 向前移动一条记录,与 router.forward() 相同
router.go(1);

// 返回上一条记录,与 router.back() 相同
router.go(-1);

// 前进 3 条记录
router.go(3);

// 若果没有那么多记录,静默失败
router.go(100);
router.go(-100);
动态路由
添加路由
根据用户权限不同,可以动态添加路由,使用 addRoute({...})
- 动态添加一级路由
// 路由实例
const router = createRouter({
  /** .... */
});

/* 根据条件判断是否添加该路由,该添加为一级路由 */
const Admin = {
  path: '/admin',
  component: () => import('@/views/Admin.vue'),
};
if (isAdmin) router.addRoute(Admin);- 动态添加 children 路由 需要给父路由添加
name属性, 在使用 addRoute 时, 第一个参数是 父路由的 name, 第二个是需要映射的组件
const router = createRouter({
  history: createWebHashHistory(),
  routes: [
    /** ... */
    {
      path: '/user',
      name: 'user', //
      component: () => import('@/views/Home.vue'),
      children: [
        {
          path: 'default',
          component: () => import('@/views/Default.vue'),
        },
      ],
    },
  ],
});
// 创建映射的动态组件
const Vip = {
  path: '/vip',
  component: () => import('@/views/Vip.vue'),
};
if (vip) {
  router.add('user', Vip);
}
动态管理路由的其他方法
常用删除
router.addRoute({ path: '/about', name: 'about', component: About });
// 该操作将会删除之前已经添加的路由,因为他们具有相同的名字,而名字必须是唯一的
// 该操作相当于覆盖替换
router.addRoute({ path: '/newabout', name: 'about', component: About });

router.addRoute({ path: '/about', name: 'about', component: About });
// 删除路由 参数为 路由的 name 属性
router.removeRoute('about');
路由的其他方法补充:
router.hasRoute(): 检查路由是否存在。router.getRoutes():获取一个包含所有路由记录的数组
路由导航守卫
vue-router 提供的导航守卫主要用来通过跳转或取消的方式守卫导航。
beforEach
- 全局前置守卫,所有的路由切换都会被回调。
- 参数:
to:即将进入的路由 Route 对象;from:即将离开的路由 Route 对象;
router.beforEach((to, form) => {
  // 已经登陆 且 路径不为 /login时,才跳转至 首页
  if (isLogin === true && to.path !== '/login') {
    return '/home';
  } else {
    return '/login';
  }
});
beforEach 回调有返回值:
- false:取消当前导航;
- 不返回或者 undefined:进行默认导航;
- 返回一个路由地址:
- 可以是一个 string 类型的路径;
- 可以是一个对象,对象中包含 path、query、params 等信息;
其它路由守卫可参考:Vue Router-导航守卫
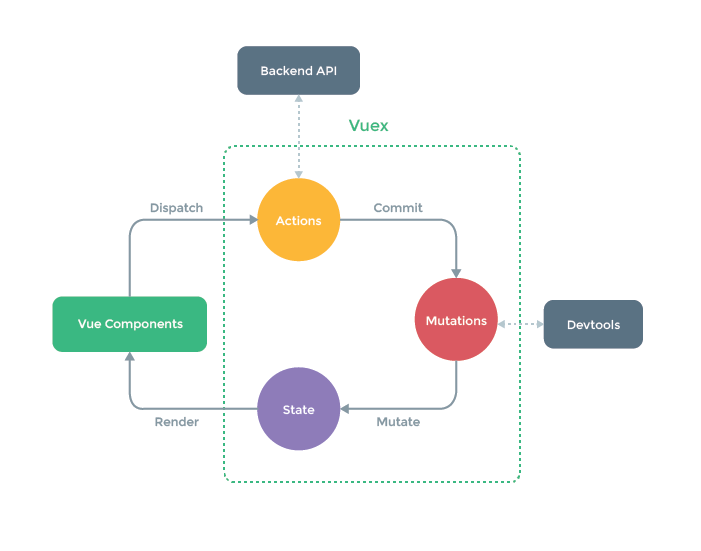
Vuex
Vuex 的数据流程图:
Vuex 基本使用
安装 vuex (4.x)
npm install vuex使用 vuex 创建 store
创建 store
// store/index.js
import { createStore } from 'vuex';

const store = createStore({
  state: () => ({
    counter: 100,
  }),
});

export default store;

// main.js
import store from './store';
app.use(store);
访问 store 数据
-
template 模板中访问
<h1>App 组件:{{ $store.state.counter }}</h1> -
js 中访问
<!-- composition API -->
<script setup>
  import { useStore } from 'vuex';
  const store = useStore();
  function add() {
    console.log(store.state.counter);
  }
</script>

<!-- options API -->
<script>
  function add() {
    console.log(this.$store.state.counter);
  }
</script>
模板中使用时,如果不想通过$store.state.xxx的繁琐格式书写,可以使用如下写法
<h1>Couputed数据:{{ storeCounter }}</h1>
<!-- vue 中支持多个 script 标签 -->
<script>
  export default {
    computed: {
      storeCounter() {
        return this.$store.state.counter;
      },
    },
  };
</script>
options API 中,如果直接通过
const { counter } = store.state解构出的数据,是非响应式的,需要使用toRefs,例如:const { counter } = toRefs(store.state)
修改 store 数据: mutations
在 store 实例中添加 mutations,在 mutations 中书写更改 store 数据的方法
const store = createStore({
  state: () => ({
    counter: 100,
  }),
  mutations: {
    // mutations 中的 方法会自动接收 state
    add(state) {
      state.counter++;
    },
  },
});
使用 mutations。通过store.commit("xxx") 调用 mutations 中的 xxx 方法
import { useStore } from 'vuex';

const store = useStore();

function add() {
  // store 中 mutation 的名称
  store.commit('add');
}
mutation 修改数据携带参数
  mutations: {
    add(state, payload) {
      // 提交单个数据
      state.counter += payload
      // 提交多数据 (对象格式)
      state.counter += payload.count
    },
  },
提交使用
// payload 普通
this.$store.commit('add', 100);
// payload 对象
store.commit({
  type: 'add',
  count: 100,
});
mapState 数据映射
computed 使用 mapState
数据量少时,可以使用 computed 的写法,当数据量很多时,此种写法也会显得过于繁琐普通写法
<script>
  export default {
    computed: {
      storeCounter() {
        return this.$store.state.counter;
      },
      /** .... */
    },
  };
</script>
mapState 写法
<script>
  import { mapState } from 'vuex';
  // state 中存在 "name", "age", "sex" 数据
  // map 映射的是一个个的函数
  mapState(['name', 'age', 'sex']);
  export default {
    computed: {
      storeCounter() {
        return this.$store.state.counter;
      },
      // 展开运算符
      ...mapState(['name', 'age', 'sex']),
    },
  };
</script>
mapState 不仅可以接收一个数组,也可以接收一个对象。
适用场景:data(){} 函数中有 name 属性,store 中也有 name 属性
<script>
  export default {
    computed: {
      storeCounter() {
        return this.$store.state.counter;
      },
      ...mapState({
        sName: (state) => state.name,
      }),
    },
  };
</script>
setup 中使用 mapState
根据 computed 中 mapState 的使用方式,在 setup 中尝试使用,因为 mapState 解构出的都是函数,所以尝试使用 computed
<script setup>
  import { computed } from 'vue';
  import { mapState } from 'vuex';
  // name age 是一个函数
  const { name, age } = mapState(['name', 'age']);

  const cName = computed(name);
  const cAge = computed(age);
</script>
会出现如下错误:

原因是,name、age 函数是通过 this.$store.state 进行访问数据,而 setup 中没有 this

若无法通过 this 访问,则可以给函数手动绑定 this,让函数有this.$store。
useState 可以通过实例 store.state 的所有数据,和 this.$store.state类似,则
<script setup>
  import { computed } from 'vue';
  import { mapState, useStore } from 'vuex';
  const { name, age } = mapState(['name', 'age']);

  const store = useStore();
  const cName = computed(name.bind({ $store: store }));
  const cAge = computed(age.bind({ $store: store }));
</script>
访问成功

setup 中 mapState hooks 封装
封装一个 hooks,循环绑定 this
import { computed } from 'vue';
import { mapState, useStore } from 'vuex';

export default function useState(mapper) {
  const store = useStore();
  const stateFnsObj = mapState(mapper);
  const newState = {};
  Object.keys(stateFnsObj).forEach((fnKey) => {
    newState[fnKey] = computed(stateFnsObj[fnKey].bind({ $store: store }));
  });
  return newState;
}
使用
<script setup>
  import useState from '@/hooks/useState';
  const { name, age } = useState(['name', 'age']);
</script>
setup 中最简单访问 store
通过解构将 store 数据拿出来。并用 toRefs 将其变成响应式
<script setup>
  import { toRefs } from 'vue';
  import { useStore } from 'vuex';
  const store = useStore();
  const { name, age } = toRefs(store.state);
</script>
setup 中的 Vuex API
getters
某些属性我们可能需要经过变化后来使用,例如:store 中 counter = 100,需要对外提供的一份 2 * counter 数据,此时就可以使用 getters
书写 getters
const store = createStore({
  state: () => ({
    counter: 100,
  }),
  // getters 中的函数会默认接收一个 state 参数
  getters: {
    doubleCounter(state) {
      return state.counter * 2;
    },
  },
  mutations: {
    // ...
  },
});
使用 getters
<template>
  <div class="app">{{ $store.getters.doubleCounter }}</div>
</template>
getters 内部的函数默认接收两个参数,
function( state, getters ){...}第一个参数是 store 中的数据,第二个就是 getters 本身,可以通过 getters 访问内部的其它函数,getters.fn。注:无需主动调用,vue 底层做了改动
mapGetters
顾名思义,既然可以使用 mapState 可以快速获取 sotre 中的值,也可以有获取 getters 的函数
// Options API
import { mapGetters } from 'vuex';

export default {
  computed: {
    ...mapGetters(['doubleCounter']),
  },
};

// Composition API
import { computed } from 'vue';
import { mapGetters, useStore } from 'vuex';
/* const { doubleCount } = mapGetters(["name", "age"]);

 const store = useStore();
const doubleCountFn = computed(doubleCount.bind({ $store: store }));  */
const { doubleCount } = toRefs(store.getters); // 推荐
mapMutations
快速使用 mutation 来改变 store 中的值
methods:{
  normal(){
    ...
  },
  ...mapMutation(["add","minus"])
}
使用时,直接在 template 中使用即可
<button @click="add">+</button>
<!-- 若需要参数,则需要写括号传参 -->
<button @click="minus(10)">-</button>
actions
mutation 是同步函数,执行异步操作,就无法追踪到数据的变化。若需要在 vuex 中发送异步请求,则需要使用 action。
- action 类似于 mutation,不同在于:
- action 提交的是 mutation,而不是直接变更状态;
- action 可以包含任意异步操作;
  mutations: {
    add(state) {
      state.counter++;
    },
  },
  action: {
    addAction(context, payload) {
      context.commit("add", payload)
    },
  },
使用:
<template>
  <div class="app">
    <h2>当前计数:{{ $store.state.counter }}</h2>
    <button @click="actionBtnClick">发起action</button>
  </div>
</template>

<script setup>
  import { useStore } from 'vuex';

  const store = useStore();
  function actionBtnClick() {
    store.dispatch('addAction', 10);
  }
</script>
action 也可以和 mutation 一样,也可以使用对象形式派发
context 是一个和 store 实例均有相同方法和属性的 context 对象。
所以我们可以从其中获取到 commit 方法来提交一个 mutation,或者通过
context.state和context.getters来获取 state 和 getters;
mutation 提交事务使用
store.commit("add"),action 派发事务使用store.dispatch("addAction")
action 的异步操作
可以通过让 action 返回 Promise,在 Promise 的 then 完成链式调用,处理完成后的操作;
// store/index.js
  actions: {
    addAction(ctx, payload) {
      return new Promise((resolve) => {
        setTimeout(() => {
          ctx.commit("add", payload);
          resolve();
        }, 2000);
      });
    },
  },
使用:
const store = useStore();
function actionBtnClick() {
  store.dispatch('addAction', 10).then(() => {
    console.log('派发完成');
  });
}
actions 内部的函数支持 async 写法,调用时依旧通过
.then链式调用
mapActions
用法和 mapGetters、mapMutations 一样
module
当维护数据格外庞大时,所有数据集中于一个 js 文件略显臃肿,Vuex 允许将 store 分割成模块(module);每个模块拥有自己的 state、mutation、action、getter、甚至是嵌套子模块;
// /store/modules/name.js
export default {
  state: () => ({
    names: ["张三", "李四", "王五"],
  }),
  mutations: {
    getNames({ names }) {
      names.push("赵六");
      return names;
    },
  },
  getters: {},
  actions: {
    getNamesAction(ctx) {
      ctx.dispatch("getNames");
    },
  },
};

// store/index.js
import { createStore } from "vuex";
import nameModule from "./modules/name";

const store = createStore({
  state: () => ({
    // ...
  }),
  getters: {
    // ...
  },
  mutations: {
    // ...
  },
  actions: {
    // ...
  },
  modules: {
    home: nameModule,
  },
});

export default store;
获取数据:一般遵循格式 $store.state[命名空间][内部属性]
<!-- home 为 index.js 中,在 modules 内部,name作为命名空间 { home: nameModule } -->
<h4>{{ $store.state.home.names }}</h4>
js 中 dispatch 和 commit 不需要命名空间,依旧是
store.commitstore.dispatch
当模块被注册后,它的所有 getter、action 及 mutation 都会自动根据模块注册的路径调整命名;
访问 state、mutation、getter 汇总:统一命名空间 user ,可以通过 user 命名空间进行访问
- 获取 state:
$store.state.user.xxx,xxx 为 state 内部数据 - 获取 getter:
$store.getters[user/xxx],xxx 为 getters 内部对 state 数据处理的函数getters: { // 四个参数 // 局部 state getter root根节点的 state getter info(state, getters, rootState, rootGetters){ return `${state.name}-${state.age}` } } - 获取 mutation:
$store.commit("user/xxx"),xxx 为 mutation 内部修改 state 的函数actions: { // 六个参数 // 局部 state getter root根节点的 state getter changeNameAction(commit, dispatch, state, rootState, getters, rootGetters){ commit("changeName","changeAge") } }
Pinia
npm i pinia
# or
yarn add pinia
Pinia 基本使用
// pinia/index.js
import { createPinia } from 'pinia';
const pinia = createPinia();
export default pinia;

// main.js
import pinia from '/pinia';
app.use(pinia);
Pinia 允许多个 store 并存,且只需创建 pinia 即可。内部会自动读取引入 defineStore 的文件变量
defineStore 接收两个参数,defineStore(id: string, options:{...}),id 必须为唯一值

注意:Store 获取到后不能被解构,那么会失去响应式
为了从 Store 中提取属性同时保持其响应式,需要使用 storeToRefs(),pinia 官方提供。也可以使用toRefs(),vue 官方提供
<h2>{{ name }}</h2>;

import { toRefs } from 'vue';
import { storeToRefs } from 'pinia';
import useName from '@/pinia/name';

const nameStore = useName();
const { name } = nameStore; // 非响应式
const { name } = toRefs(nameStore); // 响应式
const { name } = storeToRefs(nameStore); // 响应式

function btnClick() {
  nameStore.name = '李四';
}
state
-
读取和写入 state
- 默认情况下,通过 store 实例访问状态来直接读取和写入状态
import useName from '@/pinia/name'; const nameStore = useName(); nameStore.name = '李四'; -
重置 state
- 通过调用 store 上的
$reset()方法将状态 重置 到其初始值
nameStore.$reset(); - 通过调用 store 上的
-
改变 state
- 除了直接用
store.counter++修改 store,还可以调用$patch方法 - 它允许使用部分 state 对象同时应用多个更改。(一次更改多个 state 值)
nameStore.$patch({ name: '李四', age: 18, }); - 除了直接用
-
替换 State
- 可以通过将其
$state属性设置为新对象来替换 Store 的整个状态
nameStore.$state = { sex: '男', list: ['张三', '李四'], };$state问题说明:虽然官方说是替换 state,但实际结果却并非如此
- 可以通过将其
getters
和 vuex 的 getters 用法基本一致
export const useUserInfo = defineStore('userInfo', {
  state: () => ({
    firstName: '李',
    lastName: '狗蛋',
    age: 18,
  }),
  getters: {
    getName: (state) => state.firstName + state.lastName,
    doubleAge: (state) => state.age * 2,
  },
});-
访问当前 store 的 getters
userInfoStore = useUserInfo(); console.log(userInfoStore.getName); -
getters 中访问自己的其他 getters
- 通过 this 来访问到当前 store 实例的所有其他属性;
getters: { getName: (state) => this.doubleAge + 1 }, -
访问其它 store 的 getters
- 直接引入并定义其它 store 即可
getName(state)=>{ const otherStore = useOther() renturn state.firstName + otherStore.last } -
getters 也可以返回一个函数,这样就可以接受参数
getUserById(state){
 return (userId)=>{
   state.userList.find((item)=> item.id === userId)
 }
}

// 使用
const userStore = useUser()
const getUserById = userStore.getUserById
<h2>{{ getUserId(1) }}</h2>
actions
actions 相当于组件中的 methods
- pinia 的 action 中书写的函数,不会再默认接收一个 state,直接通过 this.xxx 访问内部的 所有数据,包括 state、getters、actions
changeName(){
  this.name = "李四"
}

// 使用
function btnClick(){
  nameStore.changeName()
}
异步 actions
和 vuex 的 actions 一样,返回一个 Promise
async getNameList(){
  const res = await fetch("http://xxx")
  const data = res.json()
  this.list = res.data
  // return data    // 不返回默认返回 undefined
}

getNameList(){
  return new Promise(async resolve=>{
    const res = await fetch("http://xxx")
    const data = res.json()
    this.list = res.data
    resolve(data)
  })
}

nameStore.getNameList().then(res => console.log(res))